
Overview
Description
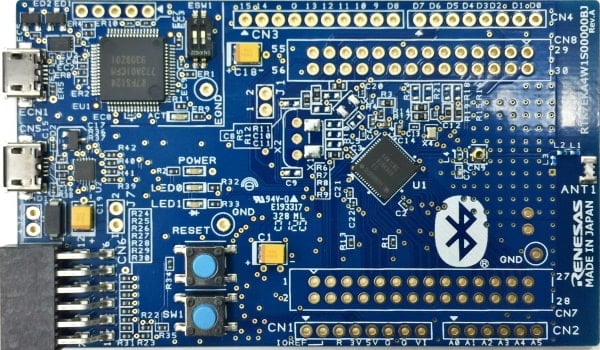
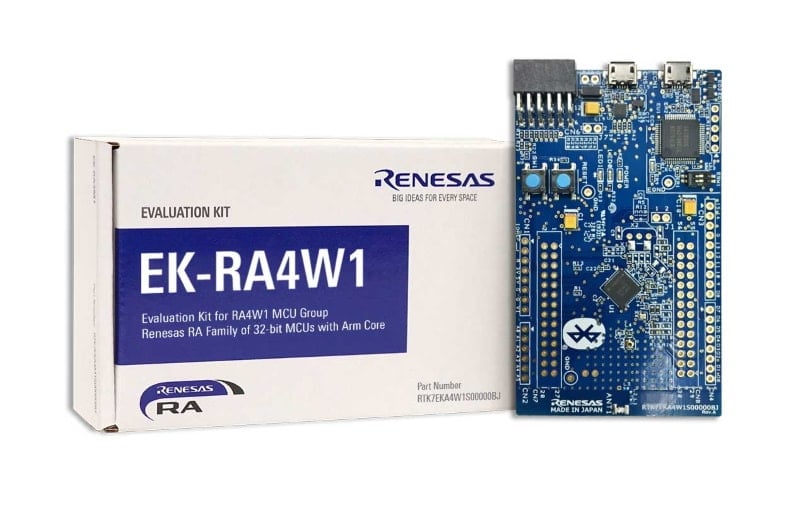
The EK-RA4W1 evaluation kit enables users to effortlessly evaluate the features of the RA4W1 MCU Group and develop embedded systems applications using Renesas' Flexible Software Package (FSP) and various IDEs.
Getting Started
Running the Quick Start Example Project
- Power up the EK-RA4W1 board through the USB debug port (J11) using the micro USB device cable connected to a 5V power source. The green power LED will light up.
- The quick start example project will begin to execute blinking the red user LED.
- Refer to the EK-RA4W1 – Quick Start Guide (ZIP) to explore additional functionality of the quick start example project.
Developing Embedded Applications
- Modifying the quick start example project – refer to the EK-RA4W1 Quick Start Guide for instructions on importing, modifying and building the quick start example project.
- Start with one of the many other example projects – choose from many example projects to learn about different peripherals of the RA4W1 MCU group. These example projects can serve as excellent starting points for you to develop your custom applications.
Building Custom Hardware
- Start by building a functional prototype - utilize the EK-RA4W1 board with your choice of ecosystem add-ons.
- Build custom hardware – develop custom hardware by referring to the design and manufacturing information provided in the EK-RA4W1 design package.
Features
- MCU Native Pin Access:
- R7FA4W1AD2CNG MCU
- 48MHz, Arm Cortex®-M4 core
- 512kB Code Flash, 96kB SRAM
- 56 pins, QFN package, 7mm x 7mm x 0.90mm, 0.5mm pitch
- MCU headers: 28 pins x2
- MCU current measurement points
- Ecosystem & System Control Access:
- USB Full Speed device
- 5V input through USB debug
- Debug on-board (Segger J-Link®)
- One Digilent PmodTM (SPI)
- User LED
- Mechanical user button
- MCU boot configuration jumper
- ArduinoTM UNO connector
Applications
Documentation
|
|
|
|
|---|---|---|
| Type | Title | Date |
| Other | EK-RA4W1 – Quick Start Guide
|
|
| Manual - Development Tools | PDF 1.12 MB 日本語 | |
| PCB Design Files | EK-RA4W1v1 - Design Package
|
|
| Application Note |
PDF
681 KB
The EK-RA4W1 example project shows how to write code for various Renesas Flexible Software Package (FSP) modules supported by the EK-RA4W1 kit. The Flexible Software Package provides an optimized, easy-to-use, scalable, and high-quality software solution for embedded system design.
|
|
| Application Note |
PDF
3.85 MB
Learn how Renesas MCU security is built around integrated security engines. The RA family includes various types, which can be identified in each MCU’s hardware manual. These engines operate in two modes: Compatibility and Protected. This application note defines both and outlines their use cases.
|
|
| Application Note |
PDF
2.35 MB
Learn how to inject plaintext keys into RA MCUs using various security engines operating in Compatibility Mode. This application note details the protection of the Root of Trust, emphasizing secure key storage through hardware unique keys (HUK) and isolated cryptographic operations within the security engine. The security engines support multiple cryptographic algorithms and key handling methods, enabling secure and efficient key management.
|
|
| Application Note |
PDF
402 KB
AI-generated Summary:
The document explains the two operational modes, highlighting their advantages and disadvantages, and provides practical guidance for selecting and using each mode. It also includes reference links to Renesas RA Family Application Projects that demonstrate these modes with detailed examples of the related FSP module usage.
|
|
| Tool News - Release | PDF 156 KB 日本語 | |
| Release Note | PDF 243 KB 日本語 | |
| Flyer | PDF 534 KB 日本語 | |
| Flyer | PDF 412 KB | |
| Presentation | PDF 7.02 MB | |
| Application Note |
PDF
1.10 MB
日本語
AI-generated Summary:
The document explains the process to acquire Bluetooth qualification for products using Bluetooth Low Energy (LE) microcomputers or modules from Renesas. It details the Qualified Design Identification (QDID) numbers applicable to various IC groups and modules, the supported Bluetooth profiles and services, and the necessary steps for Bluetooth SIG membership registration, Declaration ID purchase, and product registration. The document also clarifies the use and limitations of specific QDIDs and provides a comprehensive list of supported profiles and services for each design.
|
|
| Application Note |
PDF
1.68 MB
日本語
AI-generated Summary:
The content explains how to generate Bluetooth Low Energy (BLE) code using e² studio and transfer it to Keil® MDK for Renesas RA microcontrollers, specifically targeting the EK-RA4W1 evaluation kit. It details the required software environment, including versions of Keil MDK, e² studio, Smart Configurator, FSP, and GNU Arm Embedded Toolchain. The guide walks through creating a new RA project in e² studio, selecting the appropriate device, board, toolchain, and project template, and preparing the project for BLE custom profile creation and code generation. It also outlines the integration process of generated code into Keil MDK for further development and debugging.
|
|
| Application Note |
PDF
1.49 MB
日本語
AI-generated Summary:
The content explains how to generate and transfer QE BLE code from e² studio to IAR Embedded Workbench for ARM, specifically for Renesas RA microcontrollers using the EK-RA4W1 evaluation kit. It details the setup of the development environment, including required IDE versions, toolchains, and configuration tools. Step-by-step instructions guide users through creating a new RA project in e² studio, selecting the appropriate board and device, and configuring project settings such as language, toolchain, and debugger. The process culminates in opening the project with the FSP Configuration perspective for further development.
|
|
| Application Note |
PDF
860 KB
日本語
AI-generated Summary:
GATTBrowser for Windows enables scanning and connecting to nearby Bluetooth Low Energy (LE) devices for GATT-based communication. It displays advertising data, RSSI, services, and characteristics of connected devices, allowing manipulation and data exchange. The software runs on Windows 10 PCs with Bluetooth LE functionality. Users enable Bluetooth on their PC, install the executable, and operate the application to support Bluetooth LE product development. The document details installation, operation steps, feature descriptions, and error handling.
|
|
| Application Note |
PDF
2.54 MB
日本語
AI-generated Summary:
TryBT is an Android sample application enabling Bluetooth Low Energy communication with Renesas evaluation boards RX23W, RA4W1, and RE01B. It supports Android OS 6.0 or later and provides source code for customization. The app demonstrates device scanning, connection, and interaction with evaluation boards, including LED control and data notifications. The document details environment setup, firmware writing, app installation, operation, and customization steps. It also covers project structure, Bluetooth communication flow, and necessary software tools like Android Studio and Renesas Flash Programmer.
|
|
| Application Note |
PDF
6.40 MB
日本語
AI-generated Summary:
TryBT is an iOS sample application enabling Bluetooth Low Energy communication with Renesas evaluation boards RX23W, RA4W1, and RE01B. It supports iOS 13.0 or later and allows users to customize and reuse the source code. The document details setting up the development environment, including installing Xcode, Homebrew, Ruby, CocoaPods, and configuring Apple Developer accounts. It guides through compiling, installing TryBT, writing firmware to evaluation boards, and basic app operations such as device scanning, connection, and demo screens. The app uses Swift and requires a paid Apple Developer membership for deployment.
|
|
| Application Note |
PDF
1.62 MB
日本語
AI-generated Summary:
Windows 10 Bluetooth LE applications enable wireless communication with Renesas evaluation boards equipped with Bluetooth Low Energy microcomputers or modules. Two main applications, LED Switch Service Client and Virtual UART Client, support different device groups for tasks such as pairing, connecting, service discovery, and data communication. The document details operation flows, build environments, and implementation specifics for these applications, including API usage, pairing, connection management, and data transmission. It also references evaluation boards and software relevant to RX23W, RA4W1, RE01B, and RL78/G1D groups, providing comprehensive guidance for developing and verifying Bluetooth LE communication on Windows 10 platforms.
|
|
| Application Note |
PDF
2.33 MB
日本語
AI-generated Summary:
QE for BLE [RA,RE] facilitates testing Bluetooth Low Energy communication features on RA4W1 and RE01B MCUs, accelerating development cycles. It provides sample projects and dedicated programs to configure systems, prepare environments, and run R_BLE scripts for communication source and destination boards. The tool supports Windows OS with e2 studio IDE and Flexible Software Package (FSP). It includes instructions for connecting boards, importing projects, running scripts, and editing R_BLE scripts. Downloadable software packages and sample codes are available for seamless setup and operation.
|
|
| Application Note |
PDF
5.09 MB
日本語
AI-generated Summary:
The software enables environmental sensor network control for building and HVAC applications using RA4W1, ZMOD4410 (IAQ), and HS3001 (Humidity & Temperature Sensor). It collects air quality, humidity, and temperature data via Bluetooth 5.0 Low Energy (BLE) from multiple devices. The system supports one-to-one and one-to-many BLE connections, with device addressing via public or random MAC addresses. A dedicated GUI offers multiple operation modes: demo, sensor manufacturing, installation, operation, and developer modes, facilitating sensor setup, pairing, monitoring, and alert notifications. RA4W1 standalone mode allows BLE communication and sensor data acquisition without GUI interaction, with LED indicators reflecting TVOC levels. The document details hardware/software configurations, BLE profiles, and development environment setup for building a comprehensive environmental sensing system.
|
|
| Application Note |
PDF
1.23 MB
AI-generated Summary:
The guide provides detailed instructions for quickly setting up and operating the EK-RA4W1 evaluation kit for the RA4W1 microcontroller group. It covers kit connection, running example projects, verifying operation, and establishing communication with smartphones via Bluetooth. It also explains programming HCI firmware, connecting Bluetooth Test Tools, and restoring factory settings. The document includes safety precautions, usage limitations, and regulatory compliance advice. It emphasizes the kit’s laboratory use, potential electromagnetic interference, and liability disclaimers. The guide supports developers in evaluating and programming the RA4W1 microcontroller effectively.
|
|
| Flyer | PDF 381 KB 日本語 | |
| Report | PDF 187 KB 日本語 | |
|
24 items
|
||
Design & Development
Software & Tools
Software & Tools
| Software title
|
Software type
|
Company
|
|---|---|---|
| RA Flexible Software Package (FSP) FSP is an enhanced software package designed to provide easy-to-use, scalable, high-quality software for embedded system designs using Renesas RA Family of Arm Microcontrollers.
Note: FSP with e² studio Installer (Platform Installer) will install the e² studio tool, FSP packs, GCC toolchain, and Segger J-Link drivers required to use this software. No additional installations are required.
|
Software Package | Renesas |
| Renesas Flash Programmer (Programming GUI) Flash memory programming software [Support MCU/MPU and devices: RA, RE, RX, RL78, RH850, RISC-V MCU, Renesas Synergy, DA1453x, DA1459x, DA1469x, DA1470x, DA148xx, Power Management, Renesas USB Power Delivery Family, ICs for Motor Driver/Actuator Driver, V850, 78K0R, 78K0]
|
Programmer (Unit/SW) | Renesas |
| QuickConnect Platform QuickConnect platform enables fast prototyping by providing compatible hardware and software building blocks.
|
Software and Hardware Development Tools | Renesas |
3 items
|
||
Sample Code
Sample Code
Filters
|
||
|---|---|---|
| Type | Title | Date Date |
| Sample Code | EK-RA4W1 Example Project Bundle
[Software=RA FSP],[Board=EK-RA4W1]
ZIP
9.07 MB
IDE:
e2 studio/GCC/AC6, IAR, Keil MDK
The EK-RA4W1 example project shows how to write code for various Renesas Flexible Software Package (FSP) modules supported by the EK-RA4W1 kit. The Flexible Software Package provides an optimized, easy-to-use, scalable, and high-quality software solution for embedded system design.
|
|
| Sample Code | Injecting and Updating Secure User Keys - Sample Code
Learn how Renesas MCU security revolves around integrated security engines. There are different types of security engines across the RA MCU. Users can find the specific engine used in a particular MCU from its hardware user’s manual. The security engines can operate in two different modes, called Compatibility Mode and Protected Mode. The application note “Renesas Security Engine Operational Modes” explains the definition of the two modes and their use cases.
|
|
| Sample Code | Injecting Plaintext User Keys
Learn how to inject plaintext keys into RA MCUs using security engines operating in Compatibility Mode. Example projects for various MCUs and security engines demonstrate plaintext key injection with Renesas Flexible Software Package (FSP) APIs and PSA Certified Crypto APIs.
|
|
| Sample Code | GATTBrowser for Windows Windows Application Instruction manual - Sample Code
Application:
Consumer Electronics, Industrial
Function:
Communication Interface
IDE:
Visual Studio
|
|
| Sample Code | Bluetooth Low Energy Smartphone Application Example TryBT for Android - Sample Code
Application:
Consumer Electronics, Industrial
Compiler:
JDK
Function:
Application Example, Communication Interface
IDE:
Android Studio
|
|
| Sample Code | Bluetooth Low Energy Smartphone Application Example TryBT for iOS - Sample Code
Application:
Consumer Electronics, Industrial
Compiler:
Swift
Function:
Application Example, Communication Interface
IDE:
Xcode
|
|
| Sample Code | Bluetooth LE microcomputer / module Windows 10 Bluetooth LE Application Rev.1.00 - Sample Code
Application:
Consumer Electronics, Industrial
Function:
Communication Interface
IDE:
Visual Studio
|
|
| Sample Code | QE for BLE[RA,RE] Sample Projects and Dedicated Programs for the R_BLE Scripts Rev.1.01 - Sample Code
|
|
| Sample Code | RA4W1 group Environmental sensor network solution control sample software for building / HVAC
|
|
9 items
|
||
Product Options
| Part Number | Status | Stock | Budgetary Price (USD) | Sampleable |
|---|---|---|---|---|
| RTK7EKA4W1S00000BJ | Active | In Stock | 1u | $32.67 | Available |
Videos & Training
The Renesas RA Family of 32-bit MCUs is designed to help device developers create the next generation of secure IoT devices. They are low power, have a wide variety of peripherals and connectivity options, and sport the latest HMI to help end customers have an immersive experience.
Additional Videos
News & Blog Posts
Blog Post Jan 28, 2022 |
Blog Post Jan 28, 2022 |
Blog Post Nov 18, 2021 |
Blog Post Nov 11, 2021 |
Certifications
The EK-RA4W1 kit meets several certifications/standards. Refer to the EK-RA4W1 User's Manual (PDF | English, 日本語) for the disclaimer, precautions and details on the certifications.
Partners
Zephyr Project
The Zephyr Project is an open-source, scalable real‑time operating system (RTOS) designed for resource-constrained embedded systems and supports a wide range of hardware architectures and development boards. For the Renesas RA4W1 Evaluation Kit, Zephyr provides focused documentation covering board features, supported peripherals, and basic build, flashing, and debugging workflows to help developers quickly get started.
Support
Support Communities
- Programming EK-RA4W1 using direct USB connection from PC: Error(E3000105):
Dear Renesas team, We have EK-RA4W1 kit from Renesas. We want to flash the kit with other sample applications provided by Renesas and test the same. But I am unable to connect to target device from Renesas Flash Programmer. I get the below error ............................. Connecting the toolTool : COM port ...
Mar 10, 2022 - Can't debug with VSC on Linux (EK-RA4W1)
Hi I use the latest Renesas VSC extensions on Linux Mint 21 (Ubuntu 22.04). The Supports Folder Path is "https://www.renesas.com/home/p/.eclipse/com.renesas.platform_311039091" according to e2studion installation details / Support Folders. I added this information to the Renesas Debug Settings as shown ...
Jun 8, 2025 - Arduino sketch on EK-RA4W1
Hi, I ported Arduino library for EK-RA4W1 on FSP. This is a minimal implementation yet. You can enjoy your sketch e2studio as seen below screen shot. How to get started 1. Download the following zip. ra4w1_sketch_20210312.zip 2. Import the zip as archive file. This was exported ...
Mar 11, 2021
Knowledge Base
- RA Family: How to use the Debug Out function of J-Link OB on EK (Evaluation Kit)
... has equipped each EK (Evaluation Kit) for RA MCUs, such as EK-RA2E1, EK-RA2E2, EK-RA2L1, EK-RA2A1, etcEK-RA4M1、EK-RA4M2、EK-RA4M3、EK-RA4W1、EK-RA6M1、EK-RA6M2, EK-RA6M3, EK-RA6M4, EK-RA6M5, etc., all EKs come with J-Link OB (On-Board Debugger), which means ...
Dec 14, 2023

Support Communities


