Migrating between Integrated Development Environments
- |
- |
Overview
![]()
Projects that have been created using CS+ can be ported to the e² studio environment in either of the following two ways.
- Convert an existing project to create a new project with e² studio
- Create a new project in e² studio and register existing source files
| Process | Convert an Existing Project | Create a New Project |
|---|---|---|
| Source file registration | Automatic | Manual |
| Option setting | (Partially) automatic | Manual |
| Source file folder location | Automatic | No care needs to be taken regarding the file registration location. |
| Conflict between source files and automatically generated files | Files should be modified after a project is created. | Care should be taken regarding conflict at manual file registration. |
Converting a CS+ Project Into an e² studio Project
CA78K0R (Note1), CC-RL, and CC-RX projects from CS+ can be converted into projects of the e² studio by using the function for importing projects to the e² studio. Please also read Project migration between e² studio and CS+, Notes and Tips (PDF | English, 日本語) for descriptions of restrictions on porting projects between CS+ and the e² studio, workarounds for the restrictions, and so on.
Note
- Projects for which this compiler was used are converted into CC-RL projects.
Procedures
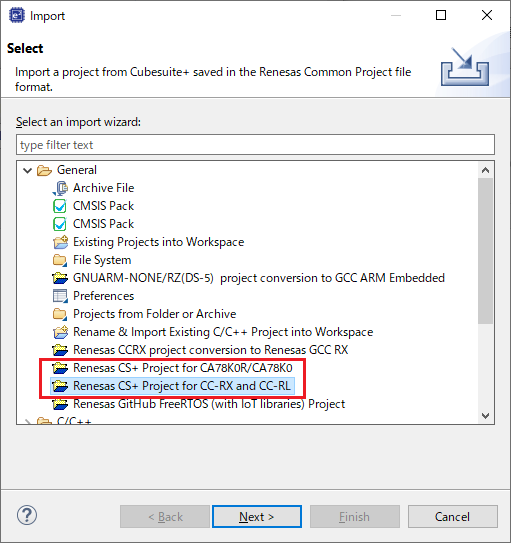
- Select [Import…] from the [File] menu of the e² studio or the pop-up menu produced by right-clicking in the project explorer pane.
Image
![Select [Import] dialog box of the e² studio](/sites/default/files/media/images/migration-csplus-to-e2studio-01-01-import.png)
- From [General], select [Renesas CS+ Project for CC-RX and CC-RL] or [Renesas CS+ Project for CA78K0R/CA78K0], then click [Next >] in the dialog box of the e² studio.
(Select [Renesas Common Project File] or [Renesas CA78K0R Project] in 32bit e² studio.)
Image
- Specify the project file from CS+ (*.rcpe) to be converted in [Select file] and import the project.
Image
![[Select file]](/sites/default/files/media/images/migration-csplus-to-e2studio-01-03-import.png)
- After you have specified the project file, the entry for [Select Target] in the [Import] dialog box of the e² studio is automatically made. Select the debugger to be used from [Debug Hardware] and click on the [Finish] button.
Image
![[Finish]](/sites/default/files/media/images/migration-csplus-to-e2studio-01-04-import.png)
Create a New Project in the e² studio and Register Existing Source Files
- Click on [File] -> [New] -> [C Project] in order from the menu bar of the e² studio and create a new C project. This launches the wizard for creating a new project shown right.
- Enter the project name in the dialog box and select the toolchain. Click on [Next >].
Image

- Specify [Toolchain Version], [Debug Hardware], and [Select Target] and click on [Next >] to go to the next step.
Image
![[Create Project] dialog box of CS+](/sites/default/files/media/images/migration-e2studio-new-02.png)
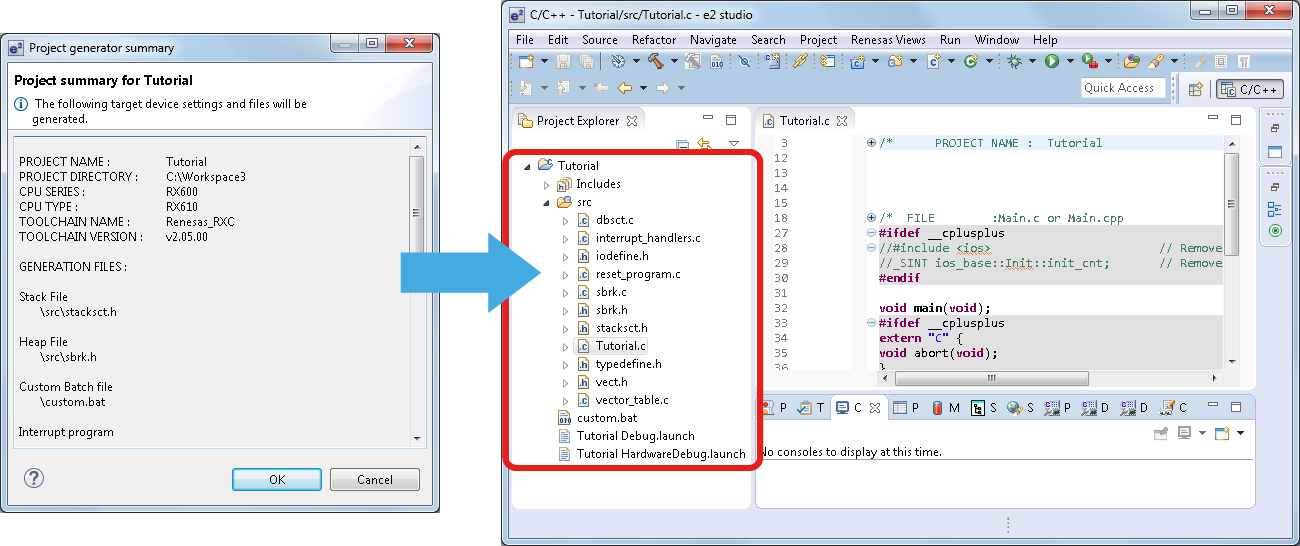
- Click on the [Finish] button after setting the required options. This produces a window [Project summary for Tutorial]. Click on [OK] and a project is generated and displayed in the e² studio as in the example on the right.
Image
- Select [Import…] -> [File System] to add an existing source file to the project. It is also possible to add new folders or files of source code from [File] -> [New].
Image
![[Import…] -> [File System] to add an existing source file to the project](/sites/default/files/media/images/migration-e2studio-new-04.png)
Support

Support Communities
Get quick technical support online from Renesas Engineering Community technical staff.

Knowledge Base
Browse our knowledge base for helpful articles, FAQs, and other useful resources.
