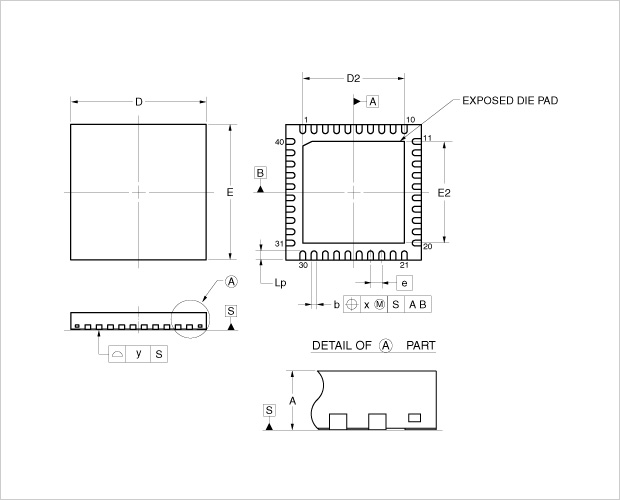
| Terminology | Reference Symbol | Description |
|---|---|---|
| Nominal dimensions | D x E | Combination of package length D and package width E |
| Package length | D | Largest dimension of the package length excluding terminals |
| Package width | E | Largest dimension of the package width excluding terminals |
| Overall length | HD or HD | Length from the tip of the terminal to another tip of the terminal on the opposite side |
| Overall width | HE or HE | Width from the tip of the terminal to another tip of the terminal on the opposite side |
| Seating plane | S | The surface determined when the package is placed on a horizontal surface |
| Datum surface A | A | Calculated by crossing 2 straight lines by the Least Squares Method from both lengthwise and then widthwise terminal center positions, then making the X axis (lengthwise) surface datum A. |
| Datum surface B | B | Calculate by crossing 2 straight lines by the Least Squares Method from both the widthwise and lengthwise terminal center positions, then making the Y axis (widthwise) surface datum B. |
| Seated height | A | Height from the seating plane to the highest point of the package ( including package warp ) |
| 1st standoff height | A1 | Distance from the seating plane to the base plane |
| Terminal pitch | e | Terminal pitch. This represents theoretical reference dimension. |
| Terminal width | b | Width of terminal with plating |
| Terminal width | b1 | Width of terminal before plating |
| Length of soldered part | Lp | Effective projected length of terminal attachment defined |
| Tolerance value of terminal center position | Positional tolerance for center axis of the terminal defined by the datum S (seating plane) , A and B. Using the maximum material principle, show the tolerance for maximum terminal width. When terminal width is narrow, allowable tolerance is increased by the difference with the maximum width. | |
| Coplanarity | y | Uniformity of the bottom-most surface of the terminal relative to the datum S (seating plane). |
| Parallelism of package top surface | y1 | Parallelism of package top surface relative to the datum S (seating plane). |
| Positional tolerance of terminal tips | t | Positional tolerance for tips of terminal defined by the datum S (seating plane), A and B. |
| Terminal thickness | c | Thickness of each terminal(including plating) |
| Terminal thickness | c1 | Thickness of terminal before plating |
| Package overhang | ZD or ZD | Distance from the true position of the outer-most terminal to the package edge |
| Package overhang | ZE or ZE | Distance from the true position of the outer-most terminal to the package edge |
| Die pad length | D2 | Length of die pad |
| Die pad width | E2 | Width of die pad |
Support

Support Communities
Get quick technical support online from Renesas Engineering Community technical staff.

Knowledge Base
Browse our knowledge base for helpful articles, FAQs, and other useful resources.
