QE: Tools for Particular Applications
Installation
1. Download and install QE from the web
- Download the installer from each QE tools page.
- Activate e² studio.
Click [Help], and then select the [Install New Software...] menu to open the [Install] dialog box.
Image
- Click the [Add...] button to open the [Add Repository] dialog box.
- Click the [Archive...] button, select the installation file (zip file) in the opened file selection dialog box, and then click the [Open] button.
- Click the [OK] button in the [Add Repository] dialog box.
Expand the [Renesas QE] item shown in the [Install] dialog box, select the [Renesas QE for XXX] check box, and then click the [Next>] button.
*If you don't need to update the modules that are related, check off the [Contact all update sites during install to find required software] checkbox to shorten the installation time.Image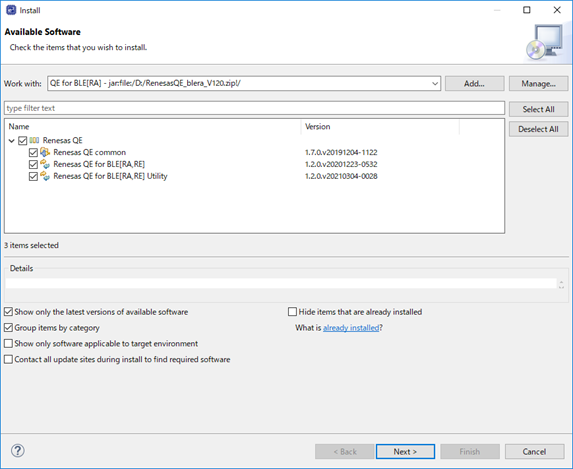
Confirm that the installation target is correct, and then click the [Next>] button.
Image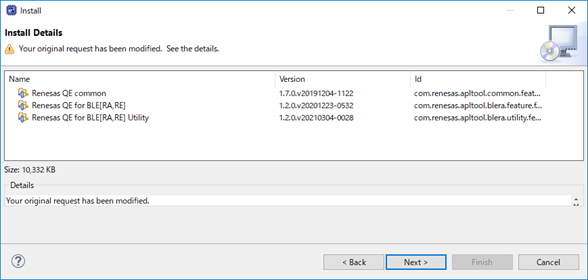
- After checking the license, select the [I accept the terms of the license agreements] radio button, and then click the [Finish] button.
- When a dialog box for selecting a trusted certificate appears, check the displayed certificate, and then click the [OK] button to continue installation.
- When prompted to restart e² studio, restart it.
- Start this product from the [Renesas Views] - [Renesas QE] menu of e² studio. For details about how to use this product, see the [Help] menu of e² studio.
2. Install QE from Renesas Software Installer in e² studio
- Activate e² studio.
Click [Renesas Views], and then select the [Renesas Software Installer] menu to open the [Renesas Software Installer] dialog box.
Image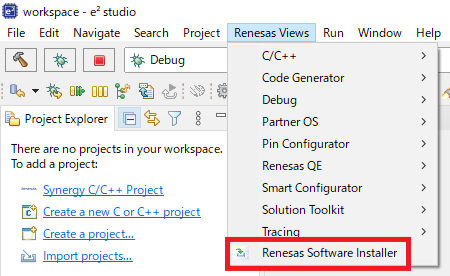
Select the [Renesas QE] and then click the [Next] button.
Image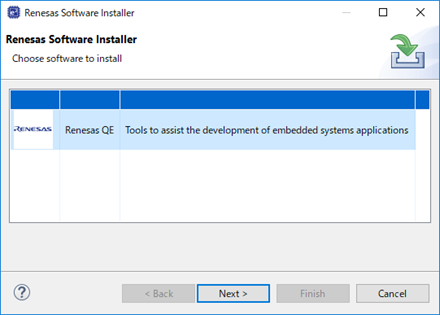
Select products to install, and then click the [Finish] button.
Image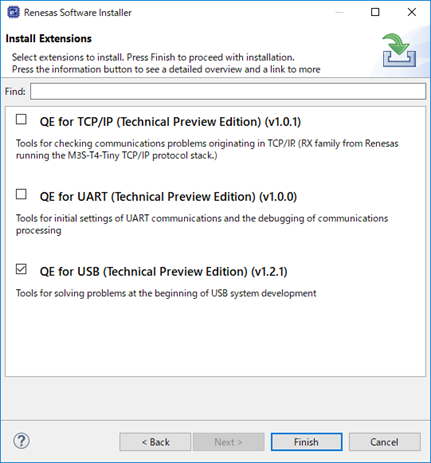
In the [Install] dialog box, check that the items you want to install are selected, and then click the [Next] button.
Image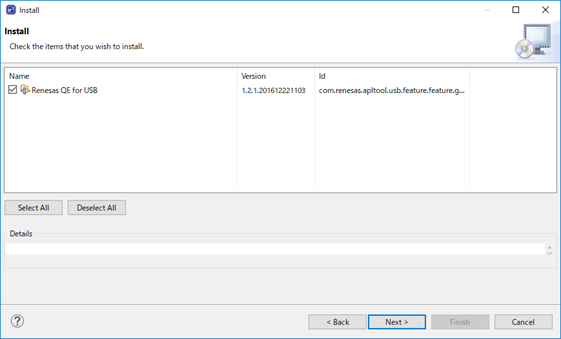
Confirm that the installation target is correct, and then click the [Next>] button.
Image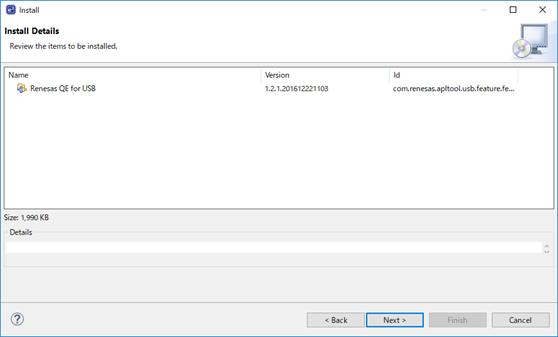
- After checking the license, select the [I accept the terms of the license agreements] radio button, and then click the [Finish] button.
- When a dialog box for selecting a trusted certificate appears, check the displayed certificate, and then click the [OK] button to continue installation.
- When prompted to restart e² studio, restart it.
- Start this product from the [Renesas Views] - [Renesas QE] menu of e² studio. For details about how to use this product, see the [Help] menu of e² studio.
Uninstallation
Use the following procedure to uninstall this product.
- Activate e² studio.
- Click [Help], and then click the [About e² studio] menu to open the [About e² studio] dialog box.
- Click[Install Details] to open the[e² studio Installation Details] dialog box.
- Select the product displayed on the [Installed Software] tabbed page and click the [Uninstall...] button to open the [Uninstall] dialog box.
- Check the displayed information and click the [Finish] button.
- When prompted to restart e² studio, restart it.
Find the tool version
Click [Help], then select the [About e² studio] menu in e² studio to open the [About e² studio] dialog box.
Image
In the [About e² studio] dialog box, press the [Installation Details] button to open the [e² studio Installation Details] dialog box.
Image
- The [Installed Software] tab in the [e² studio Installation Details] dialog box opens.
Enter “qe” as a filter.
Image
The QE tools and the versions installed in e² studio are displayed.
Image
License
・QE for Motor
・QE for Segment LCD
・QE for Camera[RA]
・QE for Display[RX,RA]
・QE for Capacitive Touch(Plugin Version)
・QE for AFE
・QE for USB
License Terms and Conditions for Renesas QE series
By clicking "I accept" then on behalf of the Client (defined below) you legally bind the Client to the License Terms and Conditions set forth below regarding Renesas QE series license (the "Agreement"), and this Agreement constitutes valid contract between Client and Renesas (defined below).
If you are not authorized to install the software on this installer medium or don't agree to the Agreement on behalf of the Client, then you should click "No" on the installer.
You should seek legal advice if you are unsure of the above matters.
This Agreement is construed and interpreted in accordance with the laws of Japan.
This Agreement set forth terms and conditions agreed to between Renesas Electronics Corporation, a Japanese company with registered office at TOYOSU FORESIA, 3-2-24, Toyosu, Koto-ku, Tokyo, 135-0061, Japan ("Renesas"); and the licensee of the software on this installer medium bound via accepting the installation process ("Client")
EFFECTIVE DATE: This Agreement is effective from the date you click "I accept" on this installer.
BACKGROUND
A. Renesas supplies Renesas IDE Software (defined below) for use in development of hardware and software related to Renesas Device (defined below).
B. Client wishes to beta test the Renesas IDE Software.
C. To assist Client in the development of the Products (defined below), Renesas is prepared to make the Materials (defined below) available to Client without charge on the terms provided herein.
OPERATIVE PROVISIONS
1. Definitions and Interpretation
1.1 In this Agreement unless the context otherwise requires, the following words and expressions shall have the following meanings:
Client Modifications means Modifications to the Renesas IDE Software made by the Client;
Documentation means the Renesas IDE Software's specifications, any release notes and any technical description including any replacements thereof or Modifications thereto provided by Renesas to Client from time to time;
EPL means the Eclipse Foundation license terms at http://www.eclipse.org/org/documents/epl-v10.php;
LGPL means the applicable GNU Lesser General Public License version terms found at http://www.gnu.org/licenses/old-licenses/lgpl-2.1.html ;
Apache means the Apache Software Foundation license terms at http://www.apache.org/licenses/LICENSE-2.0.html;
Materials means the Documentation and the Renesas IDE Software as specified in Exhibit A collectively;
Modification means addition, modification, change, enhancement or improvement;
Products means hardware or software to be or which are made, distributed and sold by or on behalf of Client which incorporates or runs on a Renesas Device;
Renesas IDE Software means the object or source code of software as specified in Exhibit A for use in the development of the Products including any replacements thereof (if any) or Modifications thereto (if any) supplied by Renesas to Client from time to time consisting of the Renesas Proprietary Software, Eclipse Software, but excluding Open Source Software;
Renesas Proprietary Software means software owned by or licensed to Renesas, including third party contributions as described in Exhibit A;
Eclipse Software means software sourced from the Eclipse Foundation and licensed to Renesas under the EPL and which Renesas has contributed to under the terms of the EPL;
LGPL Software means software sourced from the Free Software foundation, Inc. and licensed to Renesas under the LGPL and which Renesas has contributed to under the terms of the LGPL;
Apache Software means software sourced from the Apache Software Foundation and licensed to Renesas under the Apache and which Renesas has contributed to under the terms of the Apache;
Open Source Software means software as described in Clause 2.5 below and set out in the Exhibit A;
Renesas Device means semiconductor devices manufactured and or distributed by Renesas and in relation to which Client may use the Renesas IDE Software.
1.2 A reference to Clause shall mean a clause of this Agreement.
1.3 Except where the context otherwise requires, words denoting the singular include the plural and vice-versa, words denoting any gender include all genders and words denoting persons include firms and corporations and vice-versa.
1.4 All references to a statute or statutory provision shall be construed as including references to any modification, consolidation or re-enactment for the time being in force.
1.5 Headings to Clauses in this Agreement are inserted for convenience of reference only and should not be construed as forming part of this Agreement.
2. License
2.1 In consideration of the mutual obligations contained herein and subject to Client complying with its obligations in this Agreement, Renesas hereby grants to Client a worldwide, royalty free, non-exclusive, non-transferable license subject to the provisions of Clauses 2.4 and 2.5:
(1) to run and install the object code form of the Renesas IDE Software for the purposes of developing Products;
(2) to make a reasonable number of copies of the Renesas IDE Software for the purposes set forth in item (1) above;
(3) to make a reasonable number of copies of the Documentation for the purpose of assisting with the permitted use of the Renesas IDE Software.
2.2 Client is under no obligation to use the Renesas IDE Software. Client agrees to report bug details and ways to recreate the bugs.
2.3 Unless the parties agree otherwise, the Materials are provided to Client in electronic form only.
2.4 Client may subcontract any portion of the activities to perform the license under Clause 2 to any third party sub-contractors subject to Renesas' authorization under Clause 7 below.
2.5 The Eclipse Software is distributed by Renesas under the terms of the EPL. In the event that Client wishes to access, modify or redistribute the Eclipse Software, then Client must do so only in accordance with the version 1.0 of the EPL. Any provisions in this Agreement which differ from the EPL are offered by Renesas alone and not by any other party.
2.6 The JNA library as specified in Exhibit A is distributed by Renesas under the terms of the Apache license. In the event that Client wishes to access, modify or redistribute the JNA library under the Apache license, then Client must do so only in accordance with the version 2.0 of the Apache license.
2.7 The Apache Software is distributed by Renesas under the terms of the Apache. In the event that Client wishes to access, modify or redistribute the Apache Software, then Client must do so only in accordance with the version 2.0 of the Apache. Any provisions in this Agreement which differ from the Apache are offered by Renesas alone and not by any other party.
2.8 Notwithstanding anything to the contrary set forth herein, certain software parts as detailed in Exhibit A are provided as open source software ("Open Source Software") to Client and are therefore not licensed under the terms and conditions of this Agreement but under the respective open source license terms as detailed in Exhibit A.
3. Limits on Use
3.1 Except as expressly stated in this Agreement and except for the Eclipse Software subject to the EPL, the LGPL Software subject to the LGPL, the Apache Software subject to the Apache or Open Source Software subject to the respective open source license terms as detailed in Exhibit A, Client shall not, nor shall Client permit any third party to:
(1) make any copies of or Modifications to the Materials;
(2) distribute, disclose, market, rent, lease or transfer the Materials to any person or any third party;
(3) combine or integrate any Eclipse Software, LGPL Software, Apache Software or Open Source Software with any Renesas Proprietary Software, nor compile the foregoing in such a way as to so combine or integrate.
3.2 Where Renesas Proprietary Software is provided in source code form, the source code is for reference purposes only to be used for solely bug fixing and cannot be modified or redistributed in source or binary code form.
3.3 Renesas shall be entitled at all reasonable times and on reasonable notice to enter onto Client's premises, access its computer systems and carry out investigations and inquiries to check Client's compliance with this Agreement. Client shall provide Renesas with such assistance and access as Renesas may reasonably require and shall not obstruct Renesas' exercise of the rights granted to Client pursuant to Clause 2.
4. Modifications
4.1 Client Modifications are not permitted in relation to Renesas Proprietary Software (except for the part of LGPL Software). Modification to the Eclipse Software or the LGPL Software is permitted subject to compliance by Client as a contributor under the EPL or LGPL.
4.2 Client acknowledges and understands that the Client Modifications may adversely affect the performance of the Renesas IDE Software or render Renesas IDE Software useless.
4.3 Client indemnifies and holds Renesas harmless against all claims, costs, damages, demands, expenses and losses whatsoever in connection with any claims or action that the use of the Client Modifications infringes the intellectual property rights of any third party.
4.4 Should Client desire Renesas to incorporate any Client Modifications into the Materials, Client shall provide details of such Client Modifications to Renesas in either source code form or in sufficient detail to enable Renesas to make Modifications to the Materials which Renesas is permitted to do so at its sole discretion.
4.5 Should Client divulge to Renesas any details pursuant to Clause 4.4 and Client hereby irrevocably assigns to Renesas absolutely, all existing and future copyright and other intellectual property rights in or deriving from such Client Modifications for an unlimited time and on a worldwide basis. In exchange, Renesas grants to Client a license in line with Clause 2.1.
4.6 Client shall promptly notify Renesas of any proceedings involving any infringement of any or all parts of the Materials.
5. Warranty and Limitation of Liability
5.1 EXCEPT AS EXPRESSLY SET FORTH IN THIS AGREEMENT, THE MATERIALS ARE PROVIDED ON AN "AS IS" BASIS, WITHOUT WARRANTIES OR CONDITIONS OF ANY KIND, EITHER EXPRESS OR IMPLIED INCLUDING, WITHOUT LIMITATION, ANY WARRANTIES OR CONDITIONS OF TITLE, NON-INFRINGEMENT, MERCHANTABILITY OR FITNESS FOR A PARTICULAR PURPOSE. CLIENT IS SOLELY RESPONSIBLE FOR DETERMINING THE APPROPRIATENESS OF USING AND DISTRIBUTING THE MATERIALS AND ASSUMES ALL RISKS ASSOCIATED WITH ITS EXERCISE OF RIGHTS UNDER THIS AGREEMENT, INCLUDING, BUT NOT LIMITED TO, THE RISKS AND COSTS OF PROGRAM ERRORS, COMPLIANCE WITH APPLICABLE LAWS, DAMAGE TO OR LOSS OF DATA, PROGRAMS OR EQUIPMENT, AND UNAVAILABILITY OR INTERRUPTION OF OPERATIONS
5.2 IN USING THE MATERIALS CLIENT WAIVES AND DISCLAIMS ALL RIGHTS, REMEDIES, ACTIONS, PROCEEDINGS AND CLAIMS WHICH MAY NOW OR IN THE FUTURE ARISE AGAINST CONTRIBUTORS TO THE ECLIPSE SOFTWARE, APACHE SOFTWARE OR THE LGPL SOFTWARE WHETHER RELATING TO THE OWNERSHIP, INTELLECTUAL PROPERTY RIGHTS, USE, PERFORMANCE, OR OTHERWISE RELATING TO THE ECLIPSE SOFTWARE, THE LGPL SOFTWARE, APACHE SOFTWARE OR ANY OTHER OPEN SOURCE SOFTWARE.
5.3 RENESAS DOES NOT WARRANT THAT THE USE OF THE MATERIALS WILL BE UNINTERRUPTED AND ERROR-FREE.
5.4 ALL OTHER CONDITIONS, WARRANTIES OR OTHER TERMS WHICH MIGHT HAVE AN EFFECT BETWEEN THE PARTIES OR BE IMPLIED OR INCORPORATED INTO THIS AGREEMENT OR ANY COLLATERAL CONTRACT, WHETHER BY STATUTE, COMMON LAW OR OTHERWISE, ARE HEREBY EXCLUDED, INCLUDING, WITHOUT LIMITATION, IMPLIED CONDITIONS, WARRANTIES OR OTHER TERMS AS TO SATISFACTORY QUALITY, FITNESS FOR PURPOSE OR THE USE OF REASONABLE SKILL AND CARE.
5.5 (1) RENESAS SHALL HAVE NO LIABILITY FOR ANY LOSSES OR DAMAGES WHICH MAY BE SUFFERED BY THE CLIENT (OR ANY PERSON CLAIMING UNDER OR THROUGH THE CLIENT), WHETHER THE SAME ARE SUFFERED DIRECTLY OR INDIRECTLY OR ARE CONSEQUENTIAL, WHICH FALL WITHIN THE FOLLOWING CATEGORIES AND WHETHER ARISING IN CONTRACT, TORT, NEGLIGENCE:
(I) SPECIAL DAMAGE EVEN THOUGH RENESAS WAS AWARE OF THE CIRCUMSTANCES IN WHICH THE SPECIAL DAMAGE COULD ARISE;
(II) LOSS OF PROFITS, ANTICIPATED SAVINGS, BUSINESS OPPORTUNITY OR GOODWILL OR THIRD PARTY CLAIMS AGAINST CLIENT;
(III) LOSS OF DATA;
(IV) PUNITIVE OR EXEMPLARY DAMAGES.
(2) THE CLIENT ACKNOWLEDGES THAT NO REPRESENTATIONS WERE MADE PRIOR TO ENTERING INTO THIS AGREEMENT. THE CLIENT AGREES THAT, IN ENTERING INTO THIS AGREEMENT, CLIENT DID NOT RELY ON ANY REPRESENTATIONS (WHETHER WRITTEN OR ORAL) OF ANY KIND OR OF ANY PERSON OTHER THAN THOSE EXPRESSLY SET OUT IN THIS AGREEMENT AND RENESAS SHALL HAVE NO LIABILITY OTHERWISE THAN PURSUANT TO THE EXPRESS TERMS OF THIS AGREEMENT.
6. Property Rights
6.1 All copyright, know-how, patents, trademarks (including any applications therefore) and other intellectual property rights in or related to the Materials and any copies thereof and any works derived there from, shall be the property of Renesas or its licensors as the case may be ("Renesas' Intellectual Property Rights").
6.2 Client shall not acquire any rights or interest in any of the Materials or derivatives of the Materials by reason of any use or Modification of the same except as expressly granted in this Agreement or under the EPL, the Apache or the LGPL. Client shall not alter, obscure, remove, interfere with or add to any proprietary, copyright, trademark, trade names, markings or notices affixed to or contained in the Materials or copies thereof and shall ensure that the same are reproduced on any copy of the Materials.
6.3 Client shall own the copyright and all other intellectual property rights in any Modifications Client shall make to the Eclipse Software, Apache Software or the LGPL Software, subject to the underlying title, interest or intellectual property rights in the Eclipse Software so retained by Renesas and agrees to license said Modifications under the EPL, the Apache or the LGPL.
6.4 Client shall promptly notify Renesas on becoming aware of any unauthorized use of any of the Materials or suspected or actual infringement of Renesas' Intellectual Property Rights therein.
6.5 Client shall provide Renesas (at Renesas' cost) with such assistance, documents, authority and information as Renesas may reasonably require in connection with any proceedings which Renesas may institute as a result of any or any suspected infringement of Renesas' Intellectual Property Rights.
7. Confidentiality
7.1 The Materials contain information confidential to Renesas which is only disclosed to Renesas' valid licensees of the Materials and is a trade secret of Renesas. The Materials (except for the parts which are Eclipse Software, LGPL Software and Open Source Software) shall be treated as Confidential Information of Renesas.
7.2 Client shall not disclose the Materials (except for the parts which are Eclipse Software, LGPL Software, Apache Software and Open Source Software) to any person except:
(1) Client's employees, agents and sub-contractors under Clause 2.4 and then only to those persons who need to see and use the same for the purposes of exercising Client's rights under this Agreement. Before disclosing Materials to agents and subcontractors, Client has to request Renesas' authorization in writing which will not be withheld unreasonably;
(2) persons or bodies having a statutory right to know the business of Client and then only in pursuance of an order of a court with competent jurisdiction for disclosure in pursuance of such right.
7.3 Client undertakes to ensure that, prior to any disclosure of the Materials to agents and subcontractors, each of the said agents and subcontractors shall enter into a non-disclosure agreement with the Client ("Third Party NDA") with provisions not less stringent than the provisions of any current confidentiality obligation between the parties and which, among other things, shall expressly allow Renesas to directly enforce against them any non-performance of such provisions; and Client shall be responsible for the agents' and subcontractors' compliance with the Third Party NDA.
7.4 Client shall promptly inform Renesas if Client becomes aware of any breach or suspected breach of this Clause or any Third Party NDA and shall give Renesas all reasonable assistance in connection with any proceedings which Renesas may institute as a result of any such breach.
7.5 Client indemnifies and holds Renesas harmless against any claims, costs, damages, demands and losses incurred by Renesas in connection with the use of the Materials by any person or body to whom Client discloses the Materials.
8. Term and Termination
8.1 This Agreement and the license granted hereunder shall be valid and in force for a period of one (1) year from the Effective Date.
8.2 If either party ("DEFAULTING PARTY") shall fail to perform any of its obligations under this Agreement, the other party ("AGGRIEVED PARTY") may give written notice to the DEFAULTING PARTY specifying the respects in which DEFAULTING PARTY has so failed to perform its obligations under this Agreement and stating that the AGGRIEVED PARTY intends to terminate this Agreement in the event of continued default. In the event that any default so specified is not remedied within thirty (30) days after giving such written notice, the AGGRIEVED PARTY may terminate this Agreement by written notice of termination without prejudice to any right or remedy which the AGGRIEVED PARTY may have. Notwithstanding the foregoing grace period, in the event Client breaches any of their confidentiality obligations under Clause 7 above, Renesas may terminate this Agreement forthwith by giving written notice of termination to Client.
8.3 Renesas may immediately terminate this Agreement by written notice in the event that:
(1) Client is adjudicated a bankruptcy, becomes insolvent, makes a general assignment for the benefit of creditors, or enters into dissolution or liquidation proceedings;
(2) Client undergoes a substantial change in ownership (whether resulting from merger, acquisition, consolidation or otherwise), or any other person or company de facto controls the operations or policies of Client;
(3) Client transfers a major part of its business to any third party;
(4) Client breaches Clause 2, 3.1 or 4.1.
9. Effect of Termination
9.1 Notwithstanding anything contained in this Clause 9, Client shall be entitled upon termination to retain a reasonable number of copies of the Materials provided that Client shall only use such copies to support existing Products.
9.2 Termination of this Agreement shall not affect any accrued rights or liabilities of either party nor the coming into or continuance in force of any provision hereof which is expressly or by implication intended to come into or continue in force on or after such termination, including, without limitation Clauses 3, 4.1, 4.3, 4.6, 5, 6, 7, 9, 10, 11, 12, 14, 15, 16, 17 and 18.
9.3 Within fifteen (15) days of the termination or expiration of this Agreement (howsoever and by whomsoever occasioned), Client shall, at Renesas' request, return to Renesas or destroy, all copies of the Materials in its possession or control (except for the copies specified in Clause 9.1 above) and an authorized officer of Client shall certify in writing to Renesas that Client has complied with its obligations under this Clause 9.3.
10. Force Majeure
No party shall be liable to the other for any delay or non-performance of its obligations under this Agreement arising from any cause beyond its control including, without limitation, any of the following: act of God, governmental act, war, fire, flood, explosion or civil commotion.
11. Advertising and Trademarks
Client shall have no right to use any trademark or trade name of Renesas or refer to Renesas or this Agreement or the Materials directly or indirectly, in connection with any product, promotion or publication without, on each occasion, the prior written consent of Renesas both as to substance and form.
12. Waivers
The waiver by either party of a breach or default of any of the provisions of this Agreement by the other party shall not be construed as a waiver of any succeeding breach of the same or other provisions.
13. Notices
13.1 Any notice given or made under this Agreement will be in writing and sent by first class prepaid registered delivery letter to the address of that party specified in this Agreement or by facsimile transmission to the recipient's usual fax number or such other address or fax number which may be notified by that party from time to time for this purpose and will be effectual notwithstanding any change of address or fax number not so notified.
13.2 Unless the contrary shall be provided, each such notice will be deemed to have been given or made and delivered 48 hours after posting or the day of transmission if sent during normal business hours and the sender can show satisfactory transmission.
14. Compliance with Export Control
14.1 Nothing contained herein shall require Renesas Electronics to take any action contrary to the export control laws, or any other applicable laws, regulations or ordinances which are or may be promulgated by the Government of Japan, the United States or other countries having competent jurisdiction.
14.2 LICENSEE shall not export or re-export, directly or indirectly, Licensed Software and any technical information furnished to LICENSEE hereunder and/or any of the direct products resulting therefrom in contradiction to any applicable export control laws and regulation, including, but not limited to, those of Japan and the United States.
15. Applicable Law / Dispute Resolution
15.1 This Agreement shall be governed by and construed in accordance with the laws of Japan without reference to its conflict of law principles.
15.2 In the event of any dispute, controversy or difference which may arise between the parties hereto out of or in connection with or in relation to this Agreement, the parties hereto shall in the first instance do their utmost to settle such dispute, controversy or difference amicably.
15.3 The Tokyo District Court in Japan shall have exclusive jurisdiction to determine any matter arising out of or in connection with this Agreement.
15.4 Notwithstanding Clause 15.3, either party shall be entitled to seek injunction emergency or interim relief from a competent court pending resolution of the substantive matter.
16. Assignment and Sub-Contracting
Except as expressly provided herein, Client shall not be entitled to subcontract or assign any or all of its rights or obligations under this Agreement without the prior written consent of Renesas.
17. Invalidity and Severability
If a competent authority decides any part of this Agreement cannot be enforced, is invalid or illegal, that particular part will not apply but the rest of the Agreement will remain in force.
18. Entire Agreement
This Agreement supersedes all prior agreements, arrangements and undertakings between the parties and constitutes the entire agreement between the parties relating to the subject matter of this Agreement. No addition or modification of any provision of this Agreement shall be binding upon the parties unless made by a written instrument signed by duly authorized representatives of each of the parties.
Exhibit A:
Renesas IDE Software
Renesas Proprietary Software:
Renesas QE series : object code only
Open Source Software:
jQuery : MIT License
https://jquery.com/
Copyright OpenJS Foundation and other contributors, https://openjsf.org/
Permission is hereby granted, free of charge, to any person obtaining a copy of this software and associated documentation files (the "Software"), to deal in the Software without restriction, including without limitation the rights to use, copy, modify, merge, publish, distribute, sublicense, and/or sell copies of the Software, and to permit persons to whom the Software is furnished to do so, subject to the following conditions:
The above copyright notice and this permission notice shall be included in all copies or substantial portions of the Software.
THE SOFTWARE IS PROVIDED "AS IS", WITHOUT WARRANTY OF ANY KIND, EXPRESS OR IMPLIED, INCLUDING BUT NOT LIMITED TO THE WARRANTIES OF MERCHANTABILITY, FITNESS FOR A PARTICULAR PURPOSE AND NONINFRINGEMENT. IN NO EVENT SHALL THE AUTHORS OR COPYRIGHT HOLDERS BE LIABLE FOR ANY CLAIM, DAMAGES OR OTHER LIABILITY, WHETHER IN AN ACTION OF CONTRACT, TORT OR OTHERWISE, ARISING FROM, OUT OF OR IN CONNECTION WITH THE SOFTWARE OR THE USE OR OTHER DEALINGS IN THE SOFTWARE.
Swiper: MIT License
https://swiperjs.com/
The MIT License (MIT)
Copyright (c) 2019 Vladimir Kharlampidi
Permission is hereby granted, free of charge, to any person obtaining a copy of this software and associated documentation files (the "Software"), to deal in the Software without restriction, including without limitation the rights to use, copy, modify, merge, publish, distribute, sublicense, and/or sell copies of the Software, and to permit persons to whom the Software is furnished to do so, subject to the following conditions:
The above copyright notice and this permission notice shall be included in all copies or substantial portions of the Software.
THE SOFTWARE IS PROVIDED "AS IS", WITHOUT WARRANTY OF ANY KIND, EXPRESS OR IMPLIED, INCLUDING BUT NOT LIMITED TO THE WARRANTIES OF MERCHANTABILITY, FITNESS FOR A PARTICULAR PURPOSE AND NONINFRINGEMENT. IN NO EVENT SHALL THE AUTHORS OR COPYRIGHT HOLDERS BE LIABLE FOR ANY CLAIM, DAMAGES OR OTHER LIABILITY, WHETHER IN AN ACTION OF CONTRACT, TORT OR OTHERWISE, ARISING FROM, OUT OF OR IN CONNECTION WITH THE SOFTWARE OR THE USE OR OTHER DEALINGS IN THE SOFTWARE.
・QE for Display[RX] (Standalone Version)
USER LICENSE AGREEMENT
IMPORTANT-READ CAREFULLY:
This User License Agreement ("ULA") is a legal agreement between you
(either a natural person or an entity) and Renesas Electronics Corporation
("Renesas") for the SOFTWARE PRODUCT. As used herein, "SOFTWARE PRODUCT"
means the Renesas software product provided with this ULA, which includes
computer software and may include associated media, printed materials,
and "online" files or data. By installing, copying, or otherwise using
the SOFTWARE PRODUCT, you agree to be bound by the terms of this ULA.
If you do not agree to the terms of this ULA, do not install or use
the SOFTWARE PRODUCT.
1.SOFTWARE PRODUCT LICENSE
Renesas grants to you a personal, nonexclusive license to make and use
copies of SOFTWARE PRODUCT for the purposes of designing,
developing, and testing software product(s) that are designed to operate
in conjunction with any Renesas microcomputer product. You may install and
use a copy of the SOFTWARE PRODUCT only on the permitted number
of computers at any given time.
2.DESCRIPTION OF OTHER RIGHTS AND LIMITATIONS.
2-1. Prohibition of Reverse Engineering, Decompilation, and Disassembly.
You may not reverse engineer, decompile, or disassemble the SOFTWARE
PRODUCT unless such activity is expressly permitted by applicable law
notwithstanding this limitation.
2-2. Rental.
You may not rent, lease, sell, or transfer the SOFTWARE PRODUCT.
2-3. Termination.
Without prejudice to any other rights, Renesas may forthwith terminate this
ULA if you fail to comply with the terms and conditions of this ULA.
In such event, you must immediately destroy all copies of the SOFTWARE
PRODUCT and all of its component parts.
3. COPYRIGHT.
All title and copyrights in and to the SOFTWARE PRODUCT,
the accompanying printed materials, and any copies of the SOFTWARE
PRODUCT are owned by Renesas. Therefore, you may not delete or change
any copyright notice or any other proprietary notice which appears on or in
the SOFTWARE PRODUCT.
4. RECONSTRUCTION.
You may not reconstruct, modify or link the SOFTWARE PRODUCT
without prior written consent of Renesas.
5. NON-DISCLOSURE.
You may not disclose all or any part of the SOFTWARE PRODUCT
and documentation to any third party.
6. NO WARRANTY.
Renesas expressly disclaims any warranty for the SOFTWARE PRODUCT.
The SOFTWARE PRODUCT and any related documentation is provided
"as is" without warranty of any kind, either express or implied, including,
without limitation, the implied warranty of merchantability or fitness for
a particular purpose, or warranty of non-infringement.
In no event shall Renesas be liable for any damages whatsoever
(including, without limitation, damages for loss of business profits, business
interruption, loss of business information, or any other pecuniary loss)
arising out of the use of or inability to use the SOFTWARE PRODUCT,
even if Renesas has been advised of the possibility of such damages.
Because some states/jurisdictions do not allow the exclusion or limitation of
liability for consequential or incidental damages, the above limitation may not
apply to you.
Open Source Software:
jQuery : MIT License
https://jquery.com/
Copyright OpenJS Foundation and other contributors, https://openjsf.org/
Permission is hereby granted, free of charge, to any person obtaining a copy of this software and associated documentation files (the "Software"), to deal in the Software without restriction, including without limitation the rights to use, copy, modify, merge, publish, distribute, sublicense, and/or sell copies of the Software, and to permit persons to whom the Software is furnished to do so, subject to the following conditions:
The above copyright notice and this permission notice shall be included in all copies or substantial portions of the Software.
THE SOFTWARE IS PROVIDED "AS IS", WITHOUT WARRANTY OF ANY KIND, EXPRESS OR IMPLIED, INCLUDING BUT NOT LIMITED TO THE WARRANTIES OF MERCHANTABILITY, FITNESS FOR A PARTICULAR PURPOSE AND NONINFRINGEMENT. IN NO EVENT SHALL THE AUTHORS OR COPYRIGHT HOLDERS BE LIABLE FOR ANY CLAIM, DAMAGES OR OTHER LIABILITY, WHETHER IN AN ACTION OF CONTRACT, TORT OR OTHERWISE, ARISING FROM, OUT OF OR IN CONNECTION WITH THE SOFTWARE OR THE USE OR OTHER DEALINGS IN THE SOFTWARE.
Swiper : MIT License
https://swiperjs.com/
The MIT License (MIT)
Copyright (c) 2019 Vladimir Kharlampidi
Permission is hereby granted, free of charge, to any person obtaining a copy of this software and associated documentation files (the "Software"), to deal in the Software without restriction, including without limitation the rights to use, copy, modify, merge, publish, distribute, sublicense, and/or sell copies of the Software, and to permit persons to whom the Software is furnished to do so, subject to the following conditions:
The above copyright notice and this permission notice shall be included in all copies or substantial portions of the Software.
THE SOFTWARE IS PROVIDED "AS IS", WITHOUT WARRANTY OF ANY KIND, EXPRESS OR IMPLIED, INCLUDING BUT NOT LIMITED TO THE WARRANTIES OF MERCHANTABILITY, FITNESS FOR A PARTICULAR PURPOSE AND NONINFRINGEMENT. IN NO EVENT SHALL THE AUTHORS OR COPYRIGHT HOLDERS BE LIABLE FOR ANY CLAIM, DAMAGES OR OTHER LIABILITY, WHETHER IN AN ACTION OF CONTRACT, TORT OR OTHERWISE, ARISING FROM, OUT OF OR IN CONNECTION WITH THE SOFTWARE OR THE USE OR OTHER DEALINGS IN THE SOFTWARE.
・QE for Lighting & Power
USER LICENSE AGREEMENT
IMPORTANT-READ CAREFULLY:
This User License Agreement ("ULA") is a legal agreement between you
(either a natural person or an entity) and Renesas Electronics Corporation
("Renesas") for the SOFTWARE PRODUCT. As used herein, "SOFTWARE PRODUCT"
means the Renesas software product provided with this ULA, which includes
computer software and may include associated media, printed materials,
and "online" files or data. By installing, copying, or otherwise using
the SOFTWARE PRODUCT, you agree to be bound by the terms of this ULA.
If you do not agree to the terms of this ULA, do not install or use
the SOFTWARE PRODUCT.
1.SOFTWARE PRODUCT LICENSE
Renesas grants to you a personal, nonexclusive license to make and use
copies of SOFTWARE PRODUCT for the purposes of designing,
developing, and testing software product(s) that are designed to operate
in conjunction with any Renesas microcomputer product. You may install and
use a copy of the SOFTWARE PRODUCT only on the permitted number
of computers at any given time.
2.DESCRIPTION OF OTHER RIGHTS AND LIMITATIONS.
2-1. Prohibition of Reverse Engineering, Decompilation, and Disassembly.
You may not reverse engineer, decompile, or disassemble the SOFTWARE
PRODUCT unless such activity is expressly permitted by applicable law
notwithstanding this limitation.
2-2. Rental.
You may not rent, lease, sell, or transfer the SOFTWARE PRODUCT.
2-3. Termination.
Without prejudice to any other rights, Renesas may forthwith terminate this
ULA if you fail to comply with the terms and conditions of this ULA.
In such event, you must immediately destroy all copies of the SOFTWARE
PRODUCT and all of its component parts.
3. COPYRIGHT.
All title and copyrights in and to the SOFTWARE PRODUCT,
the accompanying printed materials, and any copies of the SOFTWARE
PRODUCT are owned by Renesas. Therefore, you may not delete or change
any copyright notice or any other proprietary notice which appears on or in
the SOFTWARE PRODUCT.
4. RECONSTRUCTION.
You may not reconstruct, modify or link the SOFTWARE PRODUCT
without prior written consent of Renesas.
5. NON-DISCLOSURE.
You may not disclose all or any part of the SOFTWARE PRODUCT
and documentation to any third party.
6. NO WARRANTY.
Renesas expressly disclaims any warranty for the SOFTWARE PRODUCT.
The SOFTWARE PRODUCT and any related documentation is provided
"as is" without warranty of any kind, either express or implied, including,
without limitation, the implied warranty of merchantability or fitness for
a particular purpose, or warranty of non-infringement.
In no event shall Renesas be liable for any damages whatsoever
(including, without limitation, damages for loss of business profits, business
interruption, loss of business information, or any other pecuniary loss)
arising out of the use of or inability to use the SOFTWARE PRODUCT,
even if Renesas has been advised of the possibility of such damages.
Because some states/jurisdictions do not allow the exclusion or limitation of
liability for consequential or incidental damages, the above limitation may not
apply to you.
Open Source Software:
jQuery : MIT License
https://jquery.com/
Copyright OpenJS Foundation and other contributors, https://openjsf.org/
Permission is hereby granted, free of charge, to any person obtaining a copy of this software and associated documentation files (the "Software"), to deal in the Software without restriction, including without limitation the rights to use, copy, modify, merge, publish, distribute, sublicense, and/or sell copies of the Software, and to permit persons to whom the Software is furnished to do so, subject to the following conditions:
The above copyright notice and this permission notice shall be included in all copies or substantial portions of the Software.
THE SOFTWARE IS PROVIDED "AS IS", WITHOUT WARRANTY OF ANY KIND, EXPRESS OR IMPLIED, INCLUDING BUT NOT LIMITED TO THE WARRANTIES OF MERCHANTABILITY, FITNESS FOR A PARTICULAR PURPOSE AND NONINFRINGEMENT. IN NO EVENT SHALL THE AUTHORS OR COPYRIGHT HOLDERS BE LIABLE FOR ANY CLAIM, DAMAGES OR OTHER LIABILITY, WHETHER IN AN ACTION OF CONTRACT, TORT OR OTHERWISE, ARISING FROM, OUT OF OR IN CONNECTION WITH THE SOFTWARE OR THE USE OR OTHER DEALINGS IN THE SOFTWARE.
Swiper : MIT License
https://swiperjs.com/
The MIT License (MIT)
Copyright (c) 2019 Vladimir Kharlampidi
Permission is hereby granted, free of charge, to any person obtaining a copy of this software and associated documentation files (the "Software"), to deal in the Software without restriction, including without limitation the rights to use, copy, modify, merge, publish, distribute, sublicense, and/or sell copies of the Software, and to permit persons to whom the Software is furnished to do so, subject to the following conditions:
The above copyright notice and this permission notice shall be included in all copies or substantial portions of the Software.
THE SOFTWARE IS PROVIDED "AS IS", WITHOUT WARRANTY OF ANY KIND, EXPRESS OR IMPLIED, INCLUDING BUT NOT LIMITED TO THE WARRANTIES OF MERCHANTABILITY, FITNESS FOR A PARTICULAR PURPOSE AND NONINFRINGEMENT. IN NO EVENT SHALL THE AUTHORS OR COPYRIGHT HOLDERS BE LIABLE FOR ANY CLAIM, DAMAGES OR OTHER LIABILITY, WHETHER IN AN ACTION OF CONTRACT, TORT OR OTHERWISE, ARISING FROM, OUT OF OR IN CONNECTION WITH THE SOFTWARE OR THE USE OR OTHER DEALINGS IN THE SOFTWARE.
FreeMarker : Apache License
https://freemarker.apache.org/
Licensed under the Apache License, Version 2.0 (the "License");
you may not use this file except in compliance with the License.
You may obtain a copy of the License at
http://www.apache.org/licenses/LICENSE-2.0
Unless required by applicable law or agreed to in writing, software
distributed under the License is distributed on an "AS IS" BASIS,
WITHOUT WARRANTIES OR CONDITIONS OF ANY KIND, either express or implied.
See the License for the specific language governing permissions and
limitations under the License.
・QE for OTA
License Terms and Conditions for Renesas QE series
By clicking "I accept" then on behalf of the Client (defined below) you legally bind the Client to the License Terms and Conditions set forth below regarding Renesas QE series license (the "Agreement"), and this Agreement constitutes a valid contract between Client and Renesas (defined below).
If you are not authorized to install the software on this installer medium or don't agree to the Agreement on behalf of the Client, then you should click "No" on the installer.
You should seek legal advice if you are unsure of the above matters.
This Agreement is construed and interpreted in accordance with the laws of Japan.
This Agreement set forth terms and conditions agreed to between Renesas Electronics Corporation, a Japanese company with a registered office at TOYOSU FORESIA, 3-2-24, Toyosu, Koto-ku, Tokyo, 135-0061, Japan ("Renesas"); and the licensee of the software on this installer medium bound via accepting the installation process ("Client")
EFFECTIVE DATE: This Agreement is effective from the date you click "I accept" on this installer.
BACKGROUND
A. Renesas supplies Renesas IDE Software (defined below) for use in development of hardware and software related to Renesas Device (defined below).
B. Client wishes to beta test the Renesas IDE Software.
C. To assist Client in the development of the Products (defined below), Renesas is prepared to make the Materials (defined below) available to Client without charge on the terms provided herein.
OPERATIVE PROVISIONS
1. Definitions and Interpretation
1.1 In this Agreement unless the context otherwise requires, the following words and expressions shall have the following meanings:
Client Modifications means Modifications to the Renesas IDE Software made by the Client;
Documentation means the Renesas IDE Software's specifications, any release notes and any technical description including any replacements thereof or Modifications thereto provided by Renesas to Client from time to time;
EPL means the Eclipse Foundation license terms at http://www.eclipse.org/org/documents/epl-v10.php;
LGPL means the applicable GNU Lesser General Public License version terms found at http://www.gnu.org/licenses/old-licenses/lgpl-2.1.html ;
Apache means the Apache Software Foundation license terms at http://www.apache.org/licenses/LICENSE-2.0.html;
Materials means the Documentation and the Renesas IDE Software as specified in Exhibit A collectively;
Modification means addition, modification, change, enhancement or improvement;
Products means hardware or software to be or which are made, distributed and sold by or on behalf of Client which incorporates or runs on a Renesas Device;
Renesas IDE Software means the object or source code of software as specified in Exhibit A for use in the development of the Products including any replacements thereof (if any) or Modifications thereto (if any) supplied by Renesas to Client from time to time consisting of the Renesas Proprietary Software, Eclipse Software, but excluding Open Source Software;
Renesas Proprietary Software means software owned by or licensed to Renesas, including third party contributions as described in Exhibit A;
Eclipse Software means software sourced from the Eclipse Foundation and licensed to Renesas under the EPL and which Renesas has contributed to under the terms of the EPL;
LGPL Software means software sourced from the Free Software foundation, Inc. and licensed to Renesas under the LGPL and which Renesas has contributed to under the terms of the LGPL;
Apache Software means software sourced from the Apache Software Foundation and licensed to Renesas under the Apache and which Renesas has contributed to under the terms of the Apache;
Open Source Software means software as described in Clause 2.5 below and set out in Exhibit A;
Renesas Device means semiconductor devices manufactured and or distributed by Renesas and in relation to which Client may use the Renesas IDE Software.
1.2 A reference to Clause shall mean a clause of this Agreement.
1.3 Except where the context otherwise requires, words denoting the singular include the plural and vice-versa, words denoting any gender include all genders and words denoting persons include firms and corporations and vice-versa.
1.4 All references to a statute or statutory provision shall be construed as including references to any modification, consolidation or re-enactment for the time being in force.
1.5 Headings to Clauses in this Agreement are inserted for convenience of reference only and should not be construed as forming part of this Agreement.
2. License
2.1 In consideration of the mutual obligations contained herein and subject to Client complying with its obligations in this Agreement, Renesas hereby grants to Client a worldwide, royalty-free, non-exclusive, non-transferable license subject to the provisions of Clauses 2.4 and 2.5:
(1) to run and install the object code form of the Renesas IDE Software for the purposes of developing Products;
(2) to make a reasonable number of copies of the Renesas IDE Software for the purposes set forth in item (1) above;
(3) to make a reasonable number of copies of the Documentation for the purpose of assisting with the permitted use of the Renesas IDE Software.
2.2 Client is under no obligation to use the Renesas IDE Software. Client agrees to report bug details and ways to recreate the bugs.
2.3 Unless the parties agree otherwise, the Materials are provided to Client in electronic form only.
2.4 Client may subcontract any portion of the activities to perform the license under Clause 2 to any third party sub-contractors subject to Renesas' authorization under Clause 7 below.
2.5 The Eclipse Software is distributed by Renesas under the terms of the EPL. In the event that Client wishes to access, modify or redistribute the Eclipse Software, then Client must do so only in accordance with the version 1.0 of the EPL. Any provisions in this Agreement which differ from the EPL are offered by Renesas alone and not by any other party.
2.6 The JNA library as specified in Exhibit A is distributed by Renesas under the terms of the Apache license. In the event that Client wishes to access, modify or redistribute the JNA library under the Apache license, then Client must do so only in accordance with the version 2.0 of the Apache license.
2.7 The Apache Software is distributed by Renesas under the terms of the Apache. In the event that Client wishes to access, modify or redistribute the Apache Software, then Client must do so only in accordance with the version 2.0 of the Apache. Any provisions in this Agreement which differ from the Apache are offered by Renesas alone and not by any other party.
2.8 Notwithstanding anything to the contrary set forth herein, certain software parts as detailed in Exhibit A are provided as open source software ("Open Source Software") to Client and are therefore not licensed under the terms and conditions of this Agreement but under the respective open source license terms as detailed in Exhibit A.
3. Limits on Use
3.1 Except as expressly stated in this Agreement and except for the Eclipse Software subject to the EPL, the LGPL Software subject to the LGPL, the Apache Software subject to the Apache or Open Source Software subject to the respective open source license terms as detailed in Exhibit A, Client shall not, nor shall Client permit any third party to:
(1) make any copies of or Modifications to the Materials;
(2) distribute, disclose, market, rent, lease or transfer the Materials to any person or any third party;
(3) combine or integrate any Eclipse Software, LGPL Software, Apache Software or Open Source Software with any Renesas Proprietary Software, nor compile the foregoing in such a way as to so combine or integrate.
3.2 Where Renesas Proprietary Software is provided in source code form, the source code is for reference purpose only to be used for solely bug fixing and cannot be modified or redistributed in source or binary code form.
3.3 Renesas shall be entitled at all reasonable times and on reasonable notice to enter onto Client's premises, access its computer systems and carry out investigations and inquiries to check Client's compliance with this Agreement. Client shall provide Renesas with such assistance and access as Renesas may reasonably require and shall not obstruct Renesas' exercise of the rights granted to Client pursuant to Clause 2.
4. Modifications
4.1 Client Modifications are not permitted in relation to Renesas Proprietary Software (except for the part of LGPL Software). Modification to the Eclipse Software or the LGPL Software is permitted subject to compliance by Client as a contributor under the EPL or LGPL.
4.2 Client acknowledges and understands that the Client Modifications may adversely affect the performance of the Renesas IDE Software or render Renesas IDE Software useless.
4.3 Client indemnifies and holds Renesas harmless against all claims, costs, damages, demands, expenses and losses whatsoever in connection with any claims or action that the use of the Client Modifications infringes the intellectual property rights of any third party.
4.4 Should Client desire Renesas to incorporate any Client Modifications into the Materials, Client shall provide details of such Client Modifications to Renesas in either source code form or in sufficient detail to enable Renesas to make Modifications to the Materials which Renesas is permitted to do so at its sole discretion.
4.5 Should Client divulge to Renesas any details pursuant to Clause 4.4 and Client hereby irrevocably assigns to Renesas absolutely, all existing and future copyright and other intellectual property rights in or deriving from such Client Modifications for an unlimited time and on a worldwide basis. In exchange, Renesas grants to Client a license in line with Clause 2.1.
4.6 Client shall promptly notify Renesas of any proceedings involving any infringement of any or all parts of the Materials.
5. Warranty and Limitation of Liability
5.1 EXCEPT AS EXPRESSLY SET FORTH IN THIS AGREEMENT, THE MATERIALS ARE PROVIDED ON AN "AS IS" BASIS, WITHOUT WARRANTIES OR CONDITIONS OF ANY KIND, EITHER EXPRESS OR IMPLIED INCLUDING, WITHOUT LIMITATION, ANY WARRANTIES OR CONDITIONS OF TITLE, NON-INFRINGEMENT, MERCHANTABILITY OR FITNESS FOR A PARTICULAR PURPOSE. CLIENT IS SOLELY RESPONSIBLE FOR DETERMINING THE APPROPRIATENESS OF USING AND DISTRIBUTING THE MATERIALS AND ASSUMES ALL RISKS ASSOCIATED WITH ITS EXERCISE OF RIGHTS UNDER THIS AGREEMENT, INCLUDING, BUT NOT LIMITED TO, THE RISKS AND COSTS OF PROGRAM ERRORS, COMPLIANCE WITH APPLICABLE LAWS, DAMAGE TO OR LOSS OF DATA, PROGRAMS OR EQUIPMENT, AND UNAVAILABILITY OR INTERRUPTION OF OPERATIONS
5.2 IN USING THE MATERIALS CLIENT WAIVES AND DISCLAIMS ALL RIGHTS, REMEDIES, ACTIONS, PROCEEDINGS AND CLAIMS WHICH MAY NOW OR IN THE FUTURE ARISE AGAINST CONTRIBUTORS TO THE ECLIPSE SOFTWARE, APACHE SOFTWARE OR THE LGPL SOFTWARE WHETHER RELATING TO THE OWNERSHIP, INTELLECTUAL PROPERTY RIGHTS, USE, PERFORMANCE, OR OTHERWISE RELATING TO THE ECLIPSE SOFTWARE, THE LGPL SOFTWARE, APACHE SOFTWARE OR ANY OTHER OPEN SOURCE SOFTWARE.
5.3 RENESAS DOES NOT WARRANT THAT THE USE OF THE MATERIALS WILL BE UNINTERRUPTED AND ERROR-FREE.
5.4 ALL OTHER CONDITIONS, WARRANTIES OR OTHER TERMS WHICH MIGHT HAVE AN EFFECT BETWEEN THE PARTIES OR BE IMPLIED OR INCORPORATED INTO THIS AGREEMENT OR ANY COLLATERAL CONTRACT, WHETHER BY STATUTE, COMMON LAW OR OTHERWISE, ARE HEREBY EXCLUDED, INCLUDING, WITHOUT LIMITATION, IMPLIED CONDITIONS, WARRANTIES OR OTHER TERMS AS TO SATISFACTORY QUALITY, FITNESS FOR PURPOSE OR THE USE OF REASONABLE SKILL AND CARE.
5.5 (1) RENESAS SHALL HAVE NO LIABILITY FOR ANY LOSSES OR DAMAGES WHICH MAY BE SUFFERED BY THE CLIENT (OR ANY PERSON CLAIMING UNDER OR THROUGH THE CLIENT), WHETHER THE SAME ARE SUFFERED DIRECTLY OR INDIRECTLY OR ARE CONSEQUENTIAL, WHICH FALL WITHIN THE FOLLOWING CATEGORIES AND WHETHER ARISING IN CONTRACT, TORT, NEGLIGENCE:
(I) SPECIAL DAMAGE EVEN THOUGH RENESAS WAS AWARE OF THE CIRCUMSTANCES IN WHICH THE SPECIAL DAMAGE COULD ARISE;
(II) LOSS OF PROFITS, ANTICIPATED SAVINGS, BUSINESS OPPORTUNITY OR GOODWILL OR THIRD PARTY CLAIMS AGAINST CLIENT;
(III) LOSS OF DATA;
(IV) PUNITIVE OR EXEMPLARY DAMAGES.
(2) THE CLIENT ACKNOWLEDGES THAT NO REPRESENTATIONS WERE MADE PRIOR TO ENTERING INTO THIS AGREEMENT. THE CLIENT AGREES THAT, IN ENTERING INTO THIS AGREEMENT, CLIENT DID NOT RELY ON ANY REPRESENTATIONS (WHETHER WRITTEN OR ORAL) OF ANY KIND OR OF ANY PERSON OTHER THAN THOSE EXPRESSLY SET OUT IN THIS AGREEMENT AND RENESAS SHALL HAVE NO LIABILITY OTHERWISE THAN PURSUANT TO THE EXPRESS TERMS OF THIS AGREEMENT.
6. Property Rights
6.1 All copyright, know-how, patents, trademarks (including any applications therefore) and other intellectual property rights in or related to the Materials and any copies thereof and any works derived there from, shall be the property of Renesas or its licensors as the case may be ("Renesas' Intellectual Property Rights").
6.2 Client shall not acquire any rights or interest in any of the Materials or derivatives of the Materials by reason of any use or Modification of the same except as expressly granted in this Agreement or under the EPL, the Apache or the LGPL. Client shall not alter, obscure, remove, interfere with or add to any proprietary, copyright, trade mark, trade names, markings or notices affixed to or contained in the Materials or copies thereof and shall ensure that the same are reproduced on any copy of the Materials.
6.3 Client shall own the copyright and all other intellectual property rights in any Modifications Client shall make to the Eclipse Software, Apache Software or the LGPL Software, subject to the underlying title, interest or intellectual property rights in the Eclipse Software so retained by Renesas and agrees to license said Modifications under the EPL, the Apache or the LGPL.
6.4 Client shall promptly notify Renesas on becoming aware of any unauthorized use of any of the Materials or suspected or actual infringement of Renesas' Intellectual Property Rights therein.
6.5 Client shall provide Renesas (at Renesas' cost) with such assistance, documents, authority and information as Renesas may reasonably require in connection with any proceedings which Renesas may institute as a result of any or any suspected infringement of Renesas' Intellectual Property Rights.
7. Confidentiality
7.1 The Materials contain information confidential to Renesas which is only disclosed to Renesas' valid licensees of the Materials and is a trade secret of Renesas. The Materials (except for the parts which are Eclipse Software, LGPL Software and Open Source Software) shall be treated as Confidential Information of Renesas.
7.2 Client shall not disclose the Materials (except for the parts which are Eclipse Software, LGPL Software, Apache Software and Open Source Software) to any person except:
(1) Client's employees, agents and sub-contractors under Clause 2.4 and then only to those persons who need to see and use the same for the purposes of exercising Client's rights under this Agreement. Before disclosing Materials to agents and subcontractors, Client has to request Renesas' authorization in writing which will not be withheld unreasonably;
(2) persons or bodies having a statutory right to know the business of Client and then only in pursuance of an order of a court with competent jurisdiction for disclosure in pursuance of such right.
7.3 Client undertakes to ensure that, prior to any disclosure of the Materials to agents and subcontractors, each of the said agents and subcontractors shall enter into a non-disclosure agreement with the Client ("Third Party NDA") with provisions not less stringent than the provisions of any current confidentiality obligation between the parties and which, among other things, shall expressly allow Renesas to directly enforce against them any non-performance of such provisions; and Client shall be responsible for the agents' and subcontractors' compliance with the Third Party NDA.
7.4 Client shall promptly inform Renesas if Client becomes aware of any breach or suspected breach of this Clause or any Third Party NDA and shall give Renesas all reasonable assistance in connection with any proceedings which Renesas may institute as a result of any such breach.
7.5 Client indemnifies and holds Renesas harmless against any claims, costs, damages, demands and losses incurred by Renesas in connection with the use of the Materials by any person or body to whom Client discloses the Materials.
8. Term and Termination
8.1 This Agreement and the license granted hereunder shall be valid and in force for a period of one (1) year from the Effective Date.
8.2 If either party ("DEFAULTING PARTY") shall fail to perform any of its obligations under this Agreement, the other party ("AGGRIEVED PARTY") may give written notice to the DEFAULTING PARTY specifying the respects in which DEFAULTING PARTY has so failed to perform its obligations under this Agreement and stating that the AGGRIEVED PARTY intends to terminate this Agreement in the event of continued default. In the event that any default so specified is not remedied within thirty (30) days after giving such written notice, the AGGRIEVED PARTY may terminate this Agreement by written notice of termination without prejudice to any right or remedy which the AGGRIEVED PARTY may have. Notwithstanding the foregoing grace period, in the event Client breaches any of their confidentiality obligations under Clause 7 above, Renesas may terminate this Agreement forthwith by giving written notice of termination to Client.
8.3 Renesas may immediately terminate this Agreement by written notice in the event that:
(1) Client is adjudicated a bankruptcy, becomes insolvent, makes a general assignment for the benefit of creditors, or enters into dissolution or liquidation proceedings;
(2) Client undergoes a substantial change in ownership (whether resulting from merger, acquisition, consolidation or otherwise), or any other person or company de facto controls the operations or policies of Client;
(3) Client transfers a major part of its business to any third party;
(4) Client breaches Clause 2, 3.1 or 4.1.
9. Effect of Termination
9.1 Notwithstanding anything contained in this Clause 9, Client shall be entitled upon termination to retain a reasonable number of copies of the Materials provided that Client shall only use such copies to support existing Products.
9.2 Termination of this Agreement shall not affect any accrued rights or liabilities of either party nor the coming into or continuance in force of any provision hereof which is expressly or by implication intended to come into or continue in force on or after such termination, including, without limitation Clauses 3, 4.1, 4.3, 4.6, 5, 6, 7, 9, 10, 11, 12, 14, 15, 16, 17 and 18.
9.3 Within fifteen (15) days of the termination or expiration of this Agreement (howsoever and by whomsoever occasioned), Client shall, at Renesas' request, return to Renesas or destroy, all copies of the Materials in its possession or control (except for the copies specified in Clause 9.1 above) and an authorized officer of Client shall certify in writing to Renesas that Client has complied with its obligations under this Clause 9.3.
10. Force Majeure
No party shall be liable to the other for any delay or non-performance of its obligations under this Agreement arising from any cause beyond its control including, without limitation, any of the following: act of God, governmental act, war, fire, flood, explosion or civil commotion.
11. Advertising and Trademarks
Client shall have no right to use any trademark or trade name of Renesas or refer to Renesas or this Agreement or the Materials directly or indirectly, in connection with any product, promotion or publication without, on each occasion, the prior written consent of Renesas both as to substance and form.
12. Waivers
The waiver by either party of a breach or default of any of the provisions of this Agreement by the other party shall not be construed as a waiver of any succeeding breach of the same or other provisions.
13. Notices
13.1 Any notice given or made under this Agreement will be in writing and sent by first class prepaid registered delivery letter to the address of that party specified in this Agreement or by facsimile transmission to the recipient's usual fax number or such other address or fax number which may be notified by that party from time to time for this purpose and will be effectual notwithstanding any change of address or fax number not so notified.
13.2 Unless the contrary shall be provided, each such notice will be deemed to have been given or made and delivered 48 hours after posting or the day of transmission if sent during normal business hours and the sender can show satisfactory transmission.
14. Compliance with Export Control
14.1 Nothing contained herein shall require Renesas Electronics to take any action contrary to the export control laws, or any other applicable laws, regulations or ordinances which are or may be promulgated by the Government of Japan, the United States or other countries having competent jurisdiction.
14.2 LICENSEE shall not export or re-export, directly or indirectly, Licensed Software and any technical information furnished to LICENSEE hereunder and/or any of the direct products resulting therefrom in contradiction to any applicable export control laws and regulation, including, but not limited to, those of Japan and the United States.
15. Applicable Law / Dispute Resolution
15.1 This Agreement shall be governed by and construed in accordance with the laws of Japan without reference to its conflict of law principles.
15.2 In the event of any dispute, controversy or difference which may arise between the parties hereto out of or in connection with or in relation to this Agreement, the parties hereto shall in the first instance do their utmost to settle such dispute, controversy or difference amicably.
15.3 The Tokyo District Court in Japan shall have exclusive jurisdiction to determine any matter arising out of or in connection with this Agreement.
15.4 Notwithstanding Clause 15.3, either party shall be entitled to seek injunction emergency or interim relief from a competent court pending resolution of the substantive matter.
16. Assignment and Sub-Contracting
Except as expressly provided herein, Client shall not be entitled to subcontract or assign any or all of its rights or obligations under this Agreement without the prior written consent of Renesas.
17. Invalidity and Severability
If a competent authority decides any part of this Agreement cannot be enforced, is invalid or illegal, that particular part will not apply but the rest of the Agreement will remain in force.
18. Entire Agreement
This Agreement supersedes all prior agreements, arrangements and undertakings between the parties and constitutes the entire agreement between the parties relating to the subject matter of this Agreement. No addition or modification of any provision of this Agreement shall be binding upon the parties unless made by a written instrument signed by duly authorized representatives of each of the parties.
Exhibit A:
Renesas IDE Software
Renesas Proprietary Software:
Renesas QE series: object code only
Open Source Software:
AWS Java SDK: Apache Software License, version 2.0
https://github.com/aws/aws-sdk-java-v2
Azure SDK for Java: MIT License
https://github.com/Azure/azure-sdk-for-java
BouncyCastle.Crypto.dll: MIT License
https://www.bouncycastle.org/
Newtonsoft.Json.dll: MIT License
https://www.newtonsoft.com/json
jQuery: MIT License
https://jquery.com/
Copyright OpenJS Foundation and other contributors, https://openjsf.org/
Permission is hereby granted, free of charge, to any person obtaining a copy of this software and associated documentation files (the "Software"), to deal in the Software without restriction, including without limitation the rights to use, copy, modify, merge, publish, distribute, sublicense, and/or sell copies of the Software, and to permit persons to whom the Software is furnished to do so, subject to the following conditions:
The above copyright notice and this permission notice shall be included in all copies or substantial portions of the Software.
THE SOFTWARE IS PROVIDED "AS IS", WITHOUT WARRANTY OF ANY KIND, EXPRESS OR IMPLIED, INCLUDING BUT NOT LIMITED TO THE WARRANTIES OF MERCHANTABILITY, FITNESS FOR A PARTICULAR PURPOSE AND NONINFRINGEMENT. IN NO EVENT SHALL THE AUTHORS OR COPYRIGHT HOLDERS BE LIABLE FOR ANY CLAIM, DAMAGES OR OTHER LIABILITY, WHETHER IN AN ACTION OF CONTRACT, TORT OR OTHERWISE, ARISING FROM, OUT OF OR IN CONNECTION WITH THE SOFTWARE OR THE USE OR OTHER DEALINGS IN THE SOFTWARE.
Swiper: MIT License
https://swiperjs.com/
The MIT License (MIT)
Copyright (c) 2019 Vladimir Kharlampidi
Permission is hereby granted, free of charge, to any person obtaining a copy of this software and associated documentation files (the "Software"), to deal in the Software without restriction, including without limitation the rights to use, copy, modify, merge, publish, distribute, sublicense, and/or sell copies of the Software, and to permit persons to whom the Software is furnished to do so, subject to the following conditions:
The above copyright notice and this permission notice shall be included in all copies or substantial portions of the Software.
THE SOFTWARE IS PROVIDED "AS IS", WITHOUT WARRANTY OF ANY KIND, EXPRESS OR IMPLIED, INCLUDING BUT NOT LIMITED TO THE WARRANTIES OF MERCHANTABILITY, FITNESS FOR A PARTICULAR PURPOSE AND NONINFRINGEMENT. IN NO EVENT SHALL THE AUTHORS OR COPYRIGHT HOLDERS BE LIABLE FOR ANY CLAIM, DAMAGES OR OTHER LIABILITY, WHETHER IN AN ACTION OF CONTRACT, TORT OR OTHERWISE, ARISING FROM, OUT OF OR IN CONNECTION WITH THE SOFTWARE OR THE USE OR OTHER DEALINGS IN THE SOFTWARE.
License for Source Code Generated by QE
The license for source code generated by the following products has been changed to the BSD-3-Clause license.
・QE for Segment LCD
・QE for Capacitive Touch V4.2.0 or later
・QE for Camera[RA] V1.2.0 or later
・QE for Display[RX,RA] V3.7.0 or later
・QE for Lighting & Power V2.0.0 or later
BSD 3-Clause License
Copyright 2025, Renesas Electronics Corporation and/or its affiliates
Redistribution and use in source and binary forms, with or without modification, are permitted provided that the following conditions are met:
Redistributions of source code must retain the above copyright notice, this list of conditions and the following disclaimer.
Redistributions in binary form must reproduce the above copyright notice, this list of conditions and the following disclaimer in the documentation and/or other materials provided with the distribution.
Neither the name of the copyright holder nor the names of its contributors may be used to endorse or promote products derived from this software without specific prior written permission.
THIS SOFTWARE IS PROVIDED BY THE COPYRIGHT HOLDERS AND CONTRIBUTORS “AS IS” AND ANY EXPRESS OR IMPLIED WARRANTIES, INCLUDING, BUT NOT LIMITED TO, THE IMPLIED WARRANTIES OF MERCHANTABILITY AND FITNESS FOR A PARTICULAR PURPOSE ARE DISCLAIMED. IN NO EVENT SHALL THE COPYRIGHT HOLDER OR CONTRIBUTORS BE LIABLE FOR ANY DIRECT, INDIRECT, INCIDENTAL, SPECIAL, EXEMPLARY, OR CONSEQUENTIAL DAMAGES (INCLUDING, BUT NOT LIMITED TO, PROCUREMENT OF SUBSTITUTE GOODS OR SERVICES; LOSS OF USE, DATA, OR PROFITS; OR BUSINESS INTERRUPTION) HOWEVER CAUSED AND ON ANY THEORY OF LIABILITY, WHETHER IN CONTRACT, STRICT LIABILITY, OR TORT (INCLUDING NEGLIGENCE OR OTHERWISE) ARISING IN ANY WAY OUT OF THE USE OF THIS SOFTWARE, EVEN IF ADVISED OF THE POSSIBILITY OF SUCH DAMAGE.
Products not listed above will continue to be licensed as before. For details on the license, please refer to this page.
・QE for Capacitive Touch V4.1.0 or earlier
・QE for BLE V1.8.0 or earlier
・QE for Camera V1.1.0 or earlier
・QE for Display V3.6.0 or earlier
・QE for Lighting & Power V1.2.0 or earlier
