Overview
Description
GR-LYCHEE is an IoT prototyping board with a camera and wireless capability (Wi-Fi, Bluetooth® Low Energy (LE)). It is the Gadget Renesas reference board for the Renesas RZ/A1LU group of microprocessors (MPUs). GR-LYCHEE is pin-compatible with Arduino UNO and Arm® Mbed™ enabled development platforms. You can also sketch like Arduino with the Renesas web compiler and IDE for GR.
Technical Information
Board Distributors
GR-LYCHEE boards and other shields can be purchased through the following sites:
Features
- Enables getting a VGA (640 x 480) image with an attached camera. When transferring with USB CDC, a transfer rate of 60fps can be realized.
- OpenCV v3.2 is applied and various SDKs are provided. Computer vision can be enjoyed right away.
- Equipped with ESP32. Cloud connection with Wi-Fi, smartphone communication with Bluetooth LE is possible.
- Equipped with a 4-pole audio jack. Audio input/output is possible.
- SD card can be inserted. FlashAir™ is also OK. (More about FlashAir Connection can be found on the Resources tab.)
- Mbed™ easy programming. If you copy it to storage, you can run it.
- Optional USB A connector can be equipped. Can be used for the connection of USB memory, etc.
Applications
Design & Development
Resources
Schematic/Design
- GR-LYCHEE Schematic(PDF)
- BOM List
- Layout
Sketch Reference
- GR-LYCHEE Sketch Reference
How to Program
- Create a GR-LYCHEE Arduino Sketch with Web Compiler Project
- Mbed site
- IDE for GR (sketch like Arduino style offline)
- e2 studio (Eclipse based)
Project File for e2 studio
Project file for sketching in Eclipse-based development environment e2 studio. For downloading and installing e2 studio, please refer to the e2 studio product page.
You can import as an archive file (zip) as an existing workspace from the e2 studio menu "File" -> "Import".
Do the menu "Project" -> "Update all dependencies" at the initial build. Only sources changed since the next build will be compiled.
- Project with OpenCV (Updated Dec. 13, 2019)
GR-LYCHEE Sketch OpenCV v10602 Project File (ZIP) (Arduino style, OpenCV included)
GR-LYCHEE mbed Style OpenCV v10602 Project File (ZIP) (Mbed style, OpenCV included) - OpenCV project for library generation
OpenCV Neon 02 Project File (ZIP)
DisplayApp
DisplayApp is an application that displays the camera image sent by USB CDC.
- For Windows
DisplayApp File (Windows) (ZIP)
Installing the USB driver is required on versions earlier than Windows 10.
- For Mac
DisplayApp File (Mac) (ZIP)
Below is an Arduino-like sketch example.
        #include <Arduino.h>
                #include <Camera.h>
                #include "DisplayApp.h"
                Camera camera;
                static DisplayApp display_app;
                void setup() {
                    camera.begin();
                }

                void loop() {
                    display_app.SendJpeg(camera.getJpegAdr(), (int)camera.createJpeg());
                    delay(10);
                }
                }
About FlashAirTM Connection
You can connect FlashAir to the SD socket on the back of GR-LYCHEE. You can access photos saved with GR-LYCHEE's camera from your smartphone or tablet. It can also be used as a Wi-Fi interface using iSDIO.
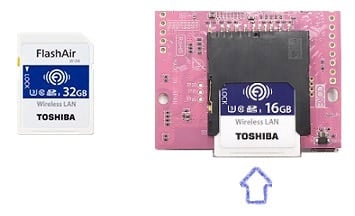
Products whose operation have been confirmed are as follows.
- FlashAir W-03 (8GB, 16GB, 32GB)
- FlashAir W-04 (16GB, 32GB)
Note: For W-04, the iSDIO function by CMD 17/24 can be used with firmware W 4.00.01 or later.
3D Data for Fusion 360
3D data that can be imported with Autodesk Fusion 360. Use it when making cases for GR-LYCHEE.
GR-LYCHEE Autodesk Fusion 360 File (ZIP)

Support
Support Communities
- Boot mode in GR-Lychee (RZ/A1LU) board
Dear everybody In RZ/A1LU operate in boot mode 1 ( boot from the serial flash memory ). in the first, affter power on. The boot start up on-chip ROM. then user program will execute in the serial flash memory. Would you please help me know where can I download ...
Jul 15, 2020 - Regarding GR LYCHEE
I am working on a GR Lychee and using E2 Studio. My queries are: 1. How to import sample projects? 2. Secondly can I do programing using Micro Usb in E2 Studio? 3. I want design usb, camera drivers, bootloader, how to proceed with this? 4. I want to work ...
Jul 28, 2018 - [Stream-it 2] How to control the USER button
... specific value. static int mode_TdI = 0; void switch_mode_TdI() { mode_TdI++;} If that can help, I knew how to do it with the GR-LYCHEE card: USER_BUTTON1 = P7_3 (in the PinName enum in PinNames.h) InterruptIn button1(USER_BUTTON1); button1.rise(&switch_mode_TdI); Thank ...
Dec 8, 2018

Support Communities


