Overview
Description
Updated: Oct. 31, 2024
Renesas Electronics Corporation
[Overview]
AI Software Development Kit (AI SDK) is an AI application development environment for RZ/V2L Evaluation Board Kit.
Please see following web page for more details.
https://renesas-rz.github.io/rzv_ai_sdk/latest/
Image
AI SDK provides following packages.
| Package | Details |
| AI SDK | Package used for AI Development. Users can build/run the AI Application easily and quickly. |
| AI SDK Source Code | Package used for Linux Development. Users can customize the Linux environment and develop your own board. |
Please see following web page for more details.
https://renesas-rz.github.io/rzv_ai_sdk/latest/
[Features]
- AI Software Development Kit (DRP-AI Translator included)
[Target Reference Boards]
RZ/V2L Evaluation Board Kit
[Latest Versions]
| Download | Version | Note | Date |
|---|---|---|---|
| RZ/V2L AI SDK v5.00 (ZIP) | 5.00 | Software | Nov 12, 2024 |
| RZ/V2L AI SDK v5.00 Release Note (PDF) | 5.00 | Document | Oct 31, 2024 |
| RZ/V2L AI SDK v5.00 Source Code (ZIP) | 5.00 | Software | Oct 31, 2024 |
[Previous Versions]
| Download | Version | Note | Date |
|---|---|---|---|
| RZ/V2L AI SDK v2.10 (ZIP) | 2.10 | Software | Nov 10, 2023 |
| RZ/V2L AI SDK v2.10 Release Note (PDF) | 2.10 | Document | Nov 10, 2023 |
| RZ/V2L AI SDK v2.10 Source Code (ZIP) | 2.10 | Software | Nov 10, 2023 |
| RZ/V2L AI Software Development Kit Version 2.00 (ZIP) | 2.00 | Software | Aug 31, 2023 |
| RZ/V2L AI Software Development Kit Version 2.00 Rlease Note (PDF) | 2.00 | Document | Aug 31, 2023 |
| RZ/V2L AI Software Development Kit Version 1.00 (ZIP) | 1.00 | Software | Apr 21, 2023 |
| RZ/V2L AI Software Development Kit Version 1.00 Release Note (PDF) | 1.00 | Document | Apr 21, 2023 |
[Support Policy]
Renesas provides support for the items below for RZ/V2L AI Software Development Kit without additional payment.
| Form | Q&A and issue analysis*1 | Maintained by Renesas | ||
| Renesas reference board | Customer board | |||
| Customer developed/modified SW | - | No | No*2 | No |
| Customer added OSS | - | No | No | No |
| Renesas developed SW | Source Code | Yes | Yes | Yes |
| Binary | Yes | Yes*3 | Yes | |
*1) Firstly, customers should investigate which part has a problem: Renesas’ deliverables or customer’s developed part.
*2) We provide support for the board-dependent changes such as channel numbers and pin configurations.
*3) We provide Q&A support only for the functions which are defined and described in the user's manual.
Target Devices
Videos & Training
RZ/V2L AI Applications Tutorial - Getting Started v2.10
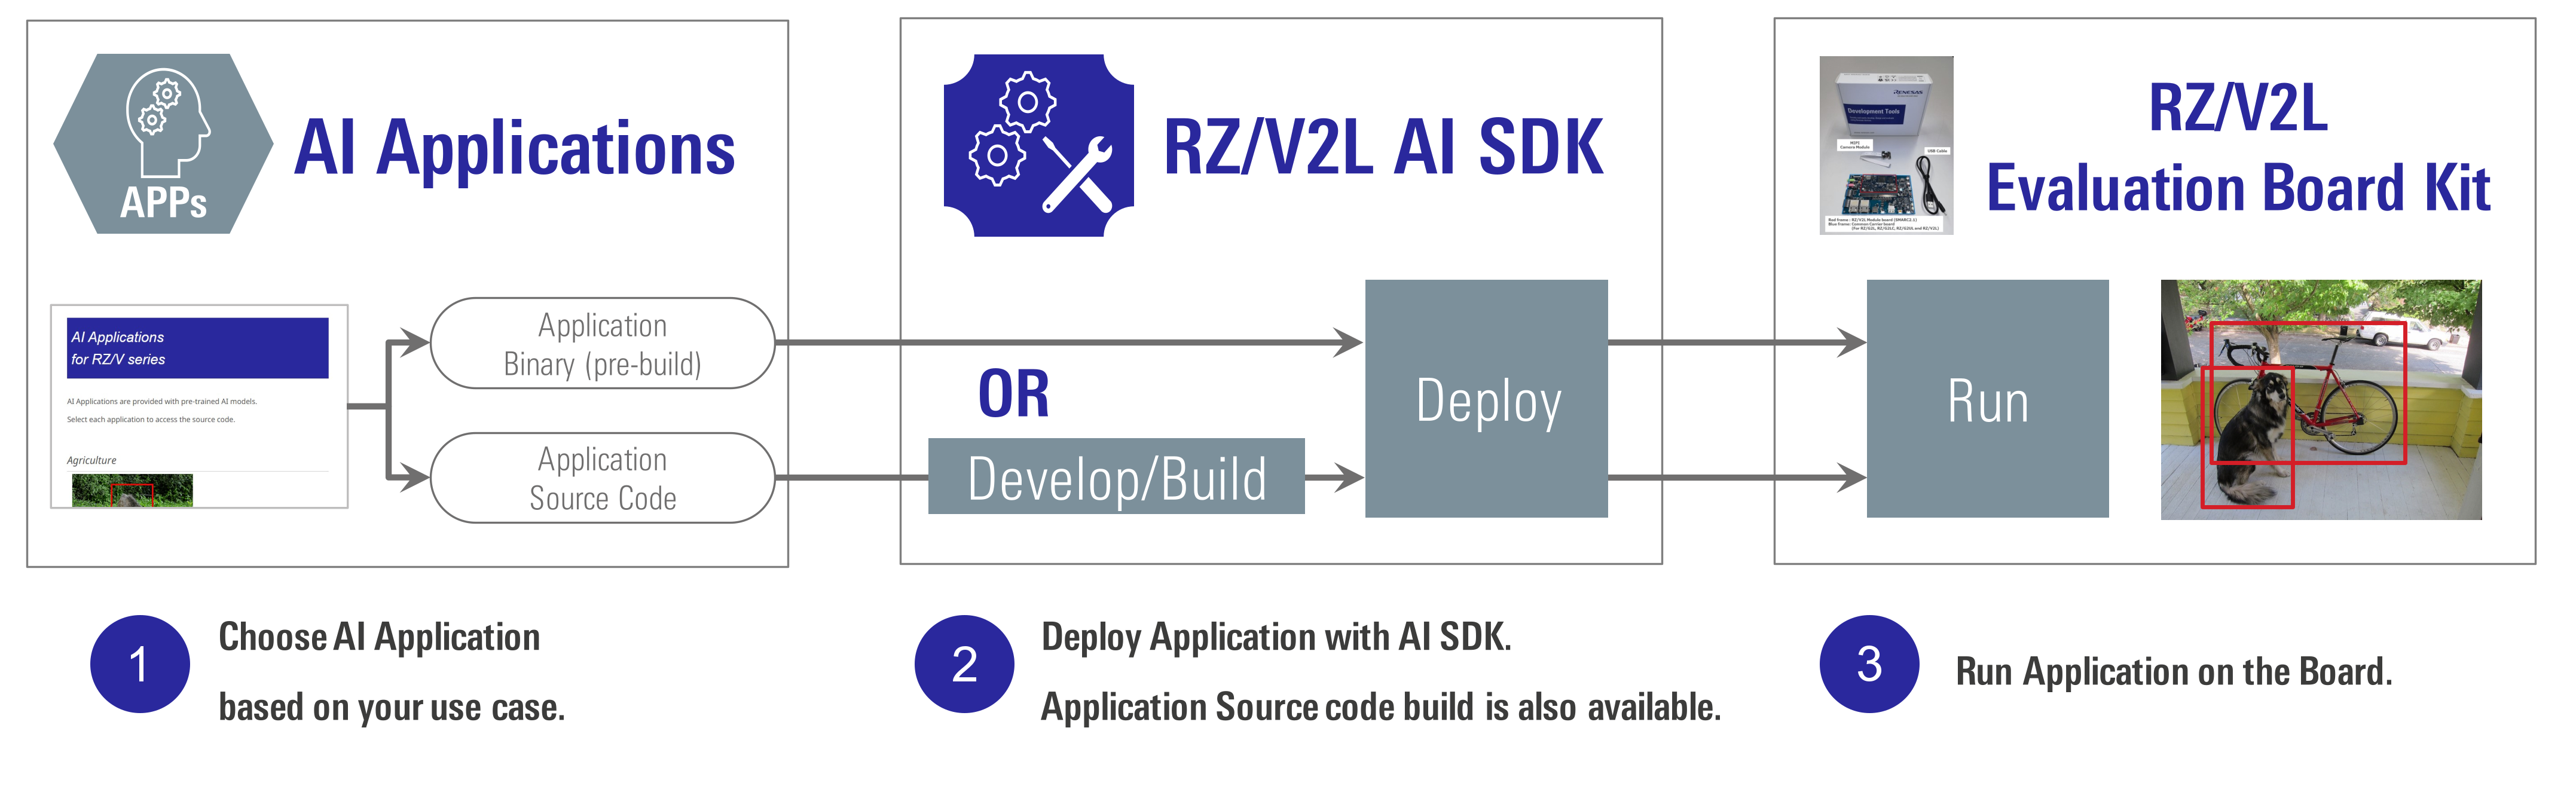
RZ/V2L AI Applications is a collection of applications running on the Renesas RZ/V2L vision AI chip. It is available on Renesas' GitHub pages. This tutorial video is based on RZ/V2L AI SDK version 2.10.
Learn more: AI Applications and AI SDK on RZ/V series
Transcript
This video is a tutorial on AI applications.
AI is becoming part of our lives. It has been used in various areas and it will keep spreading in more.
However, it is not easy to implement AI in applications.
To overcome such challenges, Renesas has released AI Applications and AI SDK for RZ/V series.
With these solutions, customers can develop AI Applications for their business easily and quickly.
This video is a tutorial on AI Applications and AI SDK.
It consists of three chapters and we will go through them in this order.
First, we will prepare the necessary environment.
Let's begin with the hardware preparation.
Please obtain the RZ/V2L Evaluation Board Kit. We will explain how to get it.
To get the board, visit Renesas RZ/V AI Web and click here. Click here.
The distributors selling the RZ/V2L Evaluation Board Kit and the remaining stock will be displayed.
Select the distributor and purchase the board.
Once you get the board, please prepare these items. This will complete your hardware preparation.
Next, let's switch to the Ubuntu PC preparation.
We will install the docker engine and Git on the Ubuntu PC.
First, install the docker engine.
From the Renesas RZ/V AI webpages, move to the official Docker page like this.
Type "Ubuntu" in the search window, please select here.
Install the docker engine as instructed here.
Once you downloaded the docker engine, install git in your ubuntu PC.
Open the terminal window. Run the installation commands in the terminal.
You need to set up your username and email address.
You have now completed the preparation of necessary equipment and software.
We can now proceed to "Set up AI SDK".
Next, we will set up AI SDK.
AI SDK is software for running AI Applications quickly and easily on the RZ/V2L Evaluation Board Kit.
We will first obtain AI SDK. To obtain AI SDK, visit the Renesas RZ/V AI webpages and click here.
Next, on this page, click here for the latest version.
Once you've downloaded the AI SDK, let's set it up.
Next, install AI SDK.
The commands can be accessed from the Renesas RZ/V AI webpages like this.
Please see here on getting started.
AI SDK is installed on top of the Docker engine as shown in the picture.
Let's install AI SDK.
Create a working directory. Register the working directory path. Go to the working directory.
Extract AI SDK here. Check the contents of the working directory.
If all directories and files are generated as shown in the log, the extraction was successful.
Then we will set up AI SDK.
Go to the working directory. Install AI SDK by building docker image. Build is completed.
Create new directory for docker container. Run the docker container.
Copy the DRP-AI TVM runtime for later use on board.
AI SDK is installed in docker container, which allows you to build the application.
You can exit the docker container by typing exit command.
AI SDK setup is now completed. The next step is to run AI Application.
Next, to check that the AI SDK has been set up properly, run the AI Application by following these steps.
AI Application is a quick and easy solution to run AI for your own use case.
It uses DRP-AI TVM to accelerate AI processing.
AI Applications can be accessed like this. Please select the category of your interest.
There are many AI Applications.
In addition to these applications, another application is available to check your setup.
It is this application. In this tutorial, we will use it.
We will try building the AI application.
The commands used in this section can be accessed like this.
The commands are described here. Copy and paste to use them.
Let's start.
Go to the working directory. Get the application source code from GitHub. The download is completed.
Then, start the build environment. Register the environment variable. Go to the source code directory.
Create a directory for the build and move to it, and build the source code.
The application build is complete. Check the results of the application build.
If this file is created, it means AI application has been built successfully.
You have completed building the AI Application.
In the next step, the docker container is not used, so please exit the container.
Next, you need to deploy AI application to the board.
Before starting to set up the microSD card, please note that some procedures are required
only when you start using AI SDK or switch to a new version of AI SDK.
First, we will need to create the partitions on the microSD card.
The commands used in this part can be accessed like this.
The commands are described here. Copy and paste to use them.
Regarding the microSD card, please prepare one with a least 4 gigabytes of free space.
Please note that the process explained here will erase all contents stored on your microSD card.
On Linux PC, a microSD card is controlled by the device file name.
In this tutorial, we use "sdb".
Device file name is assigned by the Ubuntu PC system when it recognizes the microSD card.
On your system, the device file name "sdb" may be assigned to other media.
If the "sdb" is assigned to other media, writing to "sdb" will overwrite the data and may destroy it.
In order to avoid system destruction of the media, you must check the device file name of your microSD card.
Now, let's start writing the files to the microSD card.
First, we will check the device file name of the microSD card.
Make sure that you have not inserted the microSD card to the Ubuntu PC and run this command.
Insert the microSD card to the PC and run the same command again.
Compare the results to check the device file name.
Here, the microSD card has this device file name.
Once you know your device file name, check whether current partitions are automatically mounted or not.
If it is already mounted, unmount it since it may cause error when formatting the microSD card.
Here, two partitions are automatically mounted.
Unmount the 1st partition. Unmount the 2nd partition.
Run the fdisk command to create two partitions.
Create a new DOS disklabel. Create a new partition. Select the primary partition.
Specify the 1st partition. Enter the 1st sector. Enter the last sector. Remove the signature.
Create a new partition. Select the primary partition. Specify the 2nd partition.
Enter the 1st sector. Enter the last sector. Remove the signature.
Display partition information. Write the partition information and finish fdisk command.
Reflect the partition updates. Display the microSD partition information.
Format the first partition with ext4. Format the second partition with ext4.
Now you have created the partitions on the microSD card.
Before moving to the next step, you need to eject and insert the microSD card again to mount the newly created partitions.
Run eject command. Remove the microSD card from the PC. Insert the microSD card again.
Next, we will write the Linux files.
The commands used in this part can be accessed like this. The commands are described here. Copy and paste to use them.
Go to the working directory.
To obtain the files, extract this zip file. Confirm the extraction result.
Please check that these files are shown.
Check that you have two partitions on your microSD card.
If the result is shown in the log, you have two partitions. Create a directory for the microSD card.
Mount the partition 1. Copy the Linux Kernel Image to partition 1. Copy the Linux Device Tree File to partition 1.
Copy the Linux kernel files to partition 1. Sync the microSD card to write all data stored in the cache.
Unmount the partition 1.
Mount the partition 2. Next, extract the Linux filesystem to partition 2.
Also, copy the necessary runtime file for AI Application.
Sync the microSD card to write all data stored in the cache.
Unmount the partition 2. Now you have completed writing the Linux files.
Next, we will write the bootloaders.
The commands used in this part can be accessed like this. The commands are described here. Copy and paste to use them.
Go to the bootloader directory.
Check the contents in the bootloader directory. Check that these files are shown.
Write the 1st bootloader to microSD card.
Write the 2nd bootloader to microSD card.
Write the 3rd bootloader to microSD card.
Sync the microSD card to write all data stored in the cache.
Now you have completed writing bootloaders.
Next, we will write the application to microSD card.
The application directory structure will be like this.
The commands used in this part can be accessed like this. The commands are described here. Copy and paste to use them.
We will write the application files to partition 2.
Mount the partition 2. Create the working directory on microSD card.
Start the container. Register the environment variable. Go to the yolo v3 onnx directory.
Download the file from the GitHub for Model Object. Rename the file. Exit the container. Exit the container.
Copy the label file. Then, copy the Model Object directory. Copy the Application binary.
Finally, check that all files are located appropriately.
Then, sync the microSD card to write all data stored in the cache.
Unmount the partition 2. Eject the microSD card.
Now, you have completed the microSD card setup. Remove the microSD card.
Now let's run the AI application. First, we will connect the board and all other equipment.
Insert the microSD card to the board. Change the switch configuration.
Connect the USB hub with the mouse and the keyboard.
Connect the Google Coral camera to the board. The blue part of the cable should be on the top.
Connect the board to the monitor using the micro HDMI cable.
And finally connect the USB Type-C cable to the power port. Two LEDs light up.
Now check that the overall connection looks like this.
Now, we will boot the board.
Press and hold the red power switch for 1 second.
When the third LED lights up, the board will start up.
If you see the log and the yocto screen on your monitor, the board has been booted successfully.
You can now run the AI Application. Let's check the monitor screen.
Click the icon at the top-left corner to open the terminal.
When typing to the terminal, please note that the keyboard is recognized as an English keyboard.
Go to the working directory. Change the permission of the application executable file.
Run the application.
AI Application is started.
The application detects items captured by the Google Coral camera.
You will see bounding boxes and respectively each detected item's details.
To exit the application, press the super key and the tab key simultaneously to go back to the terminal, then press the enter key.
To shutdown the board, enter the shutdown command.
Verify that the power down message is displayed like this.
After the power down log, press and hold the red power switch for 2 seconds.
When the LED turned off, disconnect the USB Type-C cable from the board. Then, disconnect all other cables.
Now you have build and run the AI Application.
Other than the example we have shown here, Renesas has released many other AI applications.
AI applications are grouped by category. Please select the category of your interest.
You can find them via this webpage.
Please try the one you are interested in.
Please submit your question or request to Renesas.
You can send your questions and requests on AI Applications and AI SDK via Issues on GitHub.
This is the end of the tutorial. Thank you for watching.
For more information, please visit Renesas GitHub Pages.
Video List