Introductory Gadget Building: 2 of 4
Welcome to the second session of our build-it-yourself Heartbeat Fan challenge. Today we will get ready to create a program on the GR-SAKURA board. Today’s session is very easy—so relax and have fun.
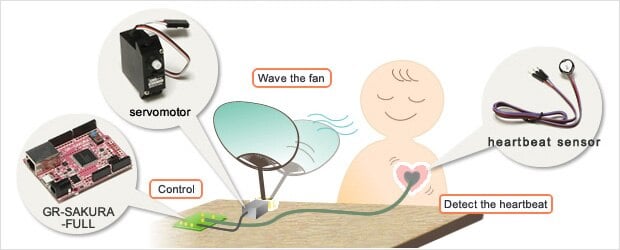
Heartbeat Fan parts of a function
The GR-SAKURA Has All the Functions We Need. Let’s Take a Look…
As we explained in the previous session, we will be using the GR-SAKURA board to control our fan. The GR-SAKURA is equipped with a built-in high-performance RX63N microcontroller. This multifunctional Renesas microcontroller incorporates a CPU, program memory, data memory, and all of the peripheral functions necessary for controlling the fan—including two ADCs (analog/digital converters), Ethernet and USB support, and a timer.
Because the RX63N includes so many peripherals, the GR-SAKURA board has limited need for additional functions and components, and therefore has only a limited number of pins for option boards. It also has relatively few connectors, and a small number of LEDs and switches soldered directly onto the board itself. (See Figure 1) The board comes in two types: the standard version (GR-SAKURA), and a full-featured version (GR-SAKURA-FULL). In this series, we will be using the full-featured version.
The GR-SAKURA is compatible with the Arduino prototyping platform, used throughout the world.
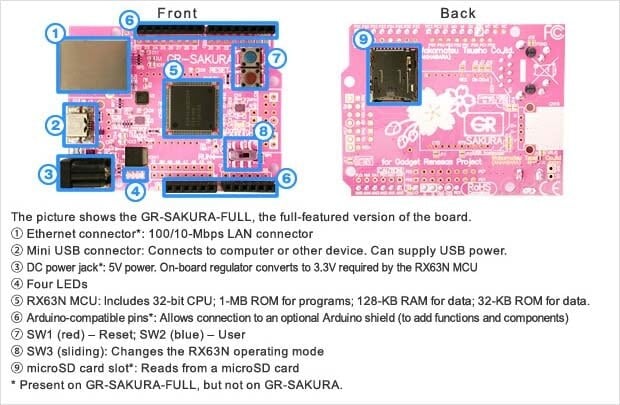
Figure 1: GR-Sakura Layout
Learn more about the RX63N family:
RX600 Family: Overview of RX63N and RX631
Easy Cloud-Based Programming
In this project, we will be putting together both the hardware and the software. Let’s begin by setting up for writing the software. Program writing has a reputation for being difficult, but in this case there is no need for concern. Programming the GR-SAKURA is easy enough, and does not require any specialized knowledge. And since Renesas has already set up a cloud environment for you, you can do your programming directly from your web browser.
Before going into the actual procedure, let’s talk a bit about programming in general. What we are going to do is create a program that will consist of instructions that will tell the microcontroller’s CPU what to do. A CPU can only understand and execute a limited set of instructions, all of which are in the form of binary numbers. These instructions are collectively referred to as machine language. Because it’s difficult for human programmers to work with these numbers, we use a human-friendly equivalent called assembly language. Assembly language uses meaningful words and syntax in place of binary numbers. Assembly language has a 1-to-1 correspondence with machine language, and must eventually be converted (“assembled”) into machine code so that the CPU can understand it.
An additional complication, however, is that each CPU model has its own machine language, and therefore its own assembly language. If you write in assembly language, therefore, you would have to rewrite the code whenever you change the CPU. We can resolve this problem by moving up to an even higher-level language that can work with all CPUs, and that is even easier for humans to understand. Many such languages exist; one of the best known of these is the C programming language. For this project we will use C++, which is based on C but also includes many significant enhancements. (C is essentially a subset of C++, and both languages use very similar syntax.)

Figure 2: Machine language, Assembly language, and C language
Program code written in a high-level language like C or C++ is called source code; and a program encoded in this way is sometimes called a source program. Before this program can run, it must be converted (“compiled”) into the binary code understood by the CPU. This conversion is carried out by another program called a compiler. The compiled program is called an object program, and its binary code is called object code. Fortunately, we have made the compiler for the GR-SAKURA accessible through the cloud, so you can compile your programs directly in your web browser. As a result, the entire process will be very easy, as you will see.
We Are Now Ready to Connect and Start the GR-SAKURA Board…
1. First, connect the board to the computer.
(1)
Slide SW3 (Figure 1-(8) ) to RUN.
(2)
Connect the GR-SAKURA to your computer using a USB cable. (Figure 1-(2) )
(3)
LED 1 (Figure 1-(4) ) will flash continuously to indicate that the board is connected to the computer.
(4)
Press SW1 (the red switch: see Figure 1-(7) ) to reset the board, so that the computer recognizes the board as a device.
2. Next, get the cloud-based web compiler ready.
(5)
Go to the Gadget Renesas webpage, and click the Login button.
(6)
Read the conditions that appear, and click Agree to proceed to the login page.
(7)
If you have already registered with My Renesas, enter your login name and password. If you aren’t registered yet, click “New user? Click here to register now”, and proceed to register. Then enter your login name and password.
(8)
A Create Project dialog box appears (Figure 3). This new project will contain all of the information required for programming the Heartbeat Fan. Select the GR-SAKURA_Sketch_V1.08.zip template in the top pane, and enter the project name, “Heartbeat Fan”, in the New Project Name text box. Then click the Create button.
(9)
The main Web Compiler screen appears, with the project name (“HeartbeatFan”) displayed in the upper left corner (Figure 4) This is your own personal cloud space, and it cannot be accessed by anyone else.
(10)
Note that a list of filenames appears at the upper-left area of the screen (below the title bar). One of these files—the one named gr_sketch.cpp—holds a sample program. To write the actual program, you will open this file and modify the code as necessary.
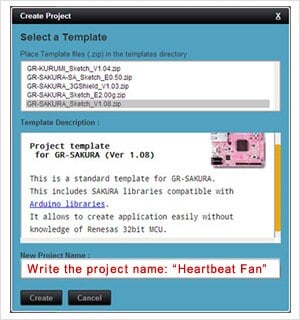
Figure 3: "Create Project" Screen

Figure 4: Web Compiler(Initial Screen)
Please also refer to the following links for additional information about using the GR-SAKURA board.
Software Library Makes Things Even Simpler!
We’re Ready to Begin Building!
In our previous session, we explained that operation of the Heartbeat Fan will require PWM control and the processing of analog input signals. It would be a rather cumbersome task if we had to program all of this processing from the ground up.
But never fear. The GR-SAKURA’s web compiler holds a library of routines that can carry out much of the standard processing we need to accomplish. You can include these routines into your own program simply by linking to them when compiling your final object code. We will go into this in more detail in Session 4 of this series.

That’s it for this session. As this series proceeds, we hope you will come to see how the GR-SAKURA board is really ideal for these kinds of introductory projects. In our next session, we will start putting together the hardware.
Module List
- What Does It Have to Do?
- A Closer Look at the GR-SAKURA Board, and Getting Ready
- Assembling the Hardware
- Creating the Software, and Completing the Project!