
SMARC SOM Evaluation Kit for RZ/V2L MPU with AI Accelerator
The RZ/V2L Evaluation Board Kit consists of a module board (SOM) and a carrier board that can easily start evaluation of the RZ/V2L. It also includes the MIPI Camera...
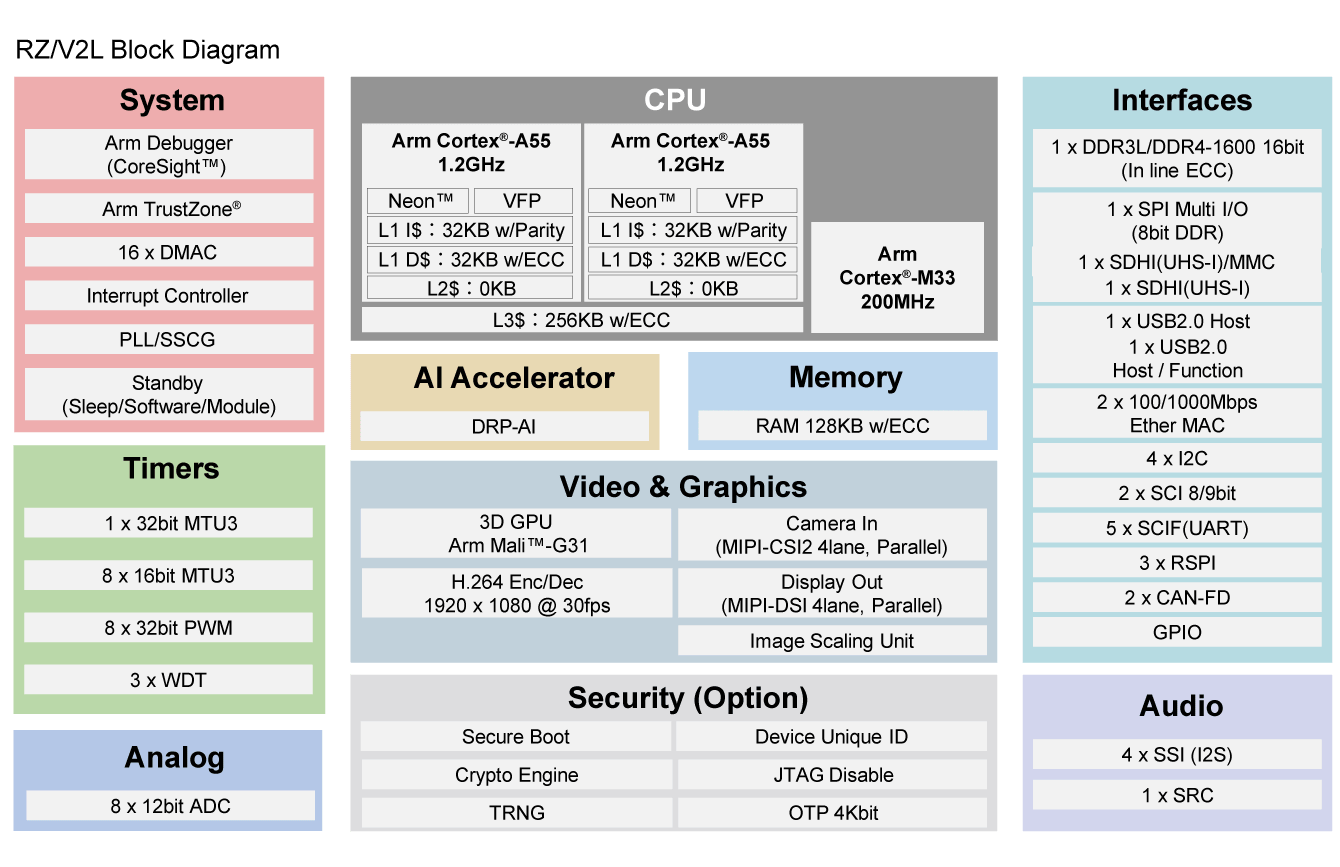
RZ/V2L is equipped with a Cortex®-A55 (1.2GHz) CPU and built-in AI accelerator "DRP-AI" for vision, which is Renesas' original technology. "DRP-AI" is configured with DRP and AI-MAC. It also has a 16-bit DDR3L/DDR4 interface and a built-in 3D graphics engine with Arm Mali-G31 and video codec (H.264).
DRP-AI’s excellent power efficiency eliminates the need for heat dissipation measures such as heat sinks or cooling fans. AI can be implemented cost efficiently not only in consumer electronics and industrial equipment but also in a wide range of applications such as point-of-sale (POS) terminals for retail. Also, the DRP-AI provides both real-time AI inference and image processing functions with the capabilities essential for camera support such as color correction and noise reduction. This enables customers to implement AI-based vision applications without requiring an external image signal processor (ISP).
The RZ/V2L is also package- and pin-compatible with the RZ/G2L. This allows RZ/G2L users to easily upgrade to the RZ/V2L for additional AI functions without needing to modify the system configuration, keeping migration costs low.
| Software title
|
Software type
|
Company
|
|---|---|---|
| DRP-AI Translator [V1.84] This is an AI model conversion tool (DRP-AI Translator) for DRP-AI equipped products. Please check the Release Notes and User's Manual first before using this product.
|
Software Package | Renesas |
| RZ/V2L DRP-AI Support Package [V7.41] This product provides the software and documentation for DRP-AI embedded within RZ/V2L.
|
Software Package | Renesas |
| RZ/V2L ISP Support Package [V.1.30] This product provides ISP Support Package for RZ/V2L. Please read the Release Note included in this first when you use the package.
|
Software Package | Renesas |
| RZ MPU Graphics Library Evaluation Version for RZ/V2L This product provides the Graphics Library for Mali GPU on RZ/V2L. Please read the release note for Board Support Package of the target devices before using this product.
|
Software Package | Renesas |
| RZ MPU Video Codec Library Evaluation Version for RZ/V2L This product provides the Video Codec Library for RZ/V2L. Please read the release note for the Board Support Package of the target devices before using this product.
|
Software Package | Renesas |
| RZ/V Multi-OS Package RZ/V Multi-OS Package is the software package consisting of RZ/V Flexible Software Package (FSP) as software package for Renesas MCU with Arm® Cortex-M, Cortex-R Core and OpenAMP as standardization API of framework for interprocessor communication for developing multi OS solution.
|
Software Package | Renesas |
| RZ/V Verified Linux Package [5.10-CIP] Linux Packages for MPUs of the RZ/V2L. Functions of this products have been verified and regular maintenance is also provided.
|
Software Package | Renesas |
| RZ MPU Security Package Security Package for RZ MPUs. This package is used in combination with the Linux package provided for each device.
|
Software Package | Renesas |
| RZ Smart Configurator RZ Smart Configurator is a utility for combining software in ways that meet your needs. It simplifies the embedding of Renesas drivers in your systems through supports for importing middleware and drivers and configuring pins.
|
Solution Toolkit | Renesas |
| e² studio - information for RZ Family Eclipse-based Renesas integrated development environment (IDE).
|
IDE and Coding Tool | Renesas |
| DRP-AI TVM (GitHub) We provide an AI model conversion tool (DRP-AI TVM) for DRP-AI-equipped products. When using this product, please check the contents of the linked README.md first.
|
Software Package | Renesas |
| RZ/V2L AI Software Development Kit AI Software Development Kit (AI SDK) is an AI application development environment for RZ/V2L Evaluation Board Kit.
|
Software Package | Renesas |
| RZ/V series AI Apps & AI SDK (GitHub) The AI SDK enables easy and rapid development of AI applications using Renesas' RZ/V series evaluation kits. Additionally, it offers a range of AI applications free of charge.
|
Software Package | Renesas |
| RZ/V2L OpenCV Accelerator Support Package [V1.10] This product provides OpenCV Accelerator Support Package for RZ/V2L.
|
Software Package | Renesas |
14 items
|
||
The RZ/V2L Evaluation Board Kit consists of a module board (SOM) and a carrier board that can easily start evaluation of the RZ/V2L. It also includes the MIPI Camera...
PerCV.ai is an RZ/V-compatible, end-to-end software and services platform that brings together all the building blocks necessary for deploying and scaling computer...
The Avnet RZBoard V2L is a power-efficient, vision-AI accelerated development board, optimized for artificial intelligence (AI)/machine learning (ML) applications. Its...
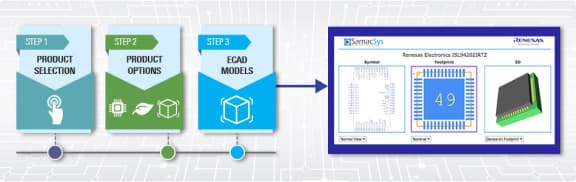
Schematic symbols, PCB footprints, and 3D CAD models from SamacSys can be found by clicking on products in the Product Options table. If a symbol or model isn't available, it can be requested directly from the website.
Series Name |
Main CPU |
Operating Freq (Max) (MHz) |
Bit Size |
Sub CPU |
RAM (KB) |
Memory Interface |
GPU |
Accelerator |
PCIe Revision |
CAN (ch) |
Ethernet |
USB |
I/O Ports |
Pkg. Type |
Lead Count (#) |
Temp. Range |
PLP |
Data Flash (KB) |
RTC |
DMA |
Timer |
ADC |
Human Machine Interface |
Supply Voltage (V) |
CPU |
Moisture Sensitivity Level (MSL) |
Price (USD) | 1ku |
Buy / Sample |
|
|---|---|---|---|---|---|---|---|---|---|---|---|---|---|---|---|---|---|---|---|---|---|---|---|---|---|---|---|---|---|
| Part Number | |||||||||||||||||||||||||||||
| RZ/V | Cortex-A55 x 2 | 1200 | 64 | Cortex-M33 | 128 | DDR3L-1333, DDR4-1600 (16-bit) | Arm Mali-G31 | DRP-AI | - | 2 | 10/100M/1G x 2 ch | USB2.0 x 2 ch (1H. 1H/F/OTG) | 123 | LFBGA | 551 | -40 to 85°C | 2032 Jul | 0 | No | Yes | 16-bit x 8-ch, 32-bit x 2-ch, 32-bit x 8-ch | 12-bit x 8-ch | Display Function, Video In | 2.97 - 3.63 | Cortex-A55 x 2 + Cortex-M33 x 1 | 3 | 24.76 | Get Samples, | |
| RZ/V | Cortex-A55 | 1200 | 64 | Cortex-M33 | 128 | DDR3L-1333, DDR4-1600 (16-bit) | Arm Mali-G31 | DRP-AI | - | 2 | 10/100M/1G x 2 ch | USB2.0 x 2 ch (1H. 1H/F/OTG) | 123 | LFBGA | 551 | -40 to 85°C | 2032 Jul | 0 | No | Yes | 16-bit x 8-ch, 32-bit x 2-ch, 32-bit x 8-ch | 12-bit x 8-ch | Display Function, Video In | 2.97 - 3.63 | Cortex-A55 x 1 + Cortex-M33 x 1 | 3 | 24.16 | Get Samples, | |
| RZ/V | Cortex-A55 x 2 | 1200 | 64 | Cortex-M33 | 128 | DDR3L-1333, DDR4-1600 (16-bit) | Arm Mali-G31 | DRP-AI | - | 2 | 10/100M/1G x 2 ch | USB2.0 x 2 ch (1H. 1H/F/OTG) | 123 | LFBGA | 551 | -40 to 85°C | 2032 Jul | 0 | No | Yes | 16-bit x 8-ch, 32-bit x 2-ch, 32-bit x 8-ch | 12-bit x 8-ch | Display Function, Video In | 2.97 - 3.63 | Cortex-A55 x 2 + Cortex-M33 x 1 | 3 | 25.35 | Get Samples, | |
| RZ/V | Cortex-A55 | 1200 | 64 | Cortex-M33 | 128 | DDR3L-1333, DDR4-1600 (16-bit) | Arm Mali-G31 | DRP-AI | - | 2 | 10/100M/1G x 2 ch | USB2.0 x 2 ch (1H. 1H/F/OTG) | 123 | LFBGA | 551 | -40 to 85°C | 2032 Jul | 0 | No | Yes | 16-bit x 8-ch, 32-bit x 2-ch, 32-bit x 8-ch | 12-bit x 8-ch | Display Function, Video In | 2.97 - 3.63 | Cortex-A55 x 1 + Cortex-M33 x 1 | 3 | 24.76 | Get Samples, | |
| RZ/V | Cortex-A55 x 2 | 1200 | 64 | Cortex-M33 | 128 | DDR3L-1333, DDR4-1600 (16-bit) | Arm Mali-G31 | DRP-AI | - | 2 | 10/100M/1G x 2 ch | USB2.0 x 2 ch (1H. 1H/F/OTG) | 123 | LFBGA | 456 | -40 to 85°C | 2032 Jul | 0 | No | Yes | 16-bit x 8-ch, 32-bit x 2-ch, 32-bit x 8-ch | 12-bit x 8-ch | Display Function, Video In | 2.97 - 3.63 | Cortex-A55 x 2 + Cortex-M33 x 1 | 3 | 19.97 | Get Samples, | |
| RZ/V | Cortex-A55 | 1200 | 64 | Cortex-M33 | 128 | DDR3L-1333, DDR4-1600 (16-bit) | Arm Mali-G31 | DRP-AI | - | 2 | 10/100M/1G x 2 ch | USB2.0 x 2 ch (1H. 1H/F/OTG) | 123 | LFBGA | 456 | -40 to 85°C | 2032 Jul | 0 | No | Yes | 16-bit x 8-ch, 32-bit x 2-ch, 32-bit x 8-ch | 12-bit x 8-ch | Display Function, Video In | 2.97 - 3.63 | Cortex-A55 x 1 + Cortex-M33 x 1 | 3 | 20 | Get Samples, | |
| RZ/V | Cortex-A55 x 2 | 1200 | 64 | Cortex-M33 | 128 | DDR3L-1333, DDR4-1600 (16-bit) | Arm Mali-G31 | DRP-AI | - | 2 | 10/100M/1G x 2 ch | USB2.0 x 2 ch (1H. 1H/F/OTG) | 123 | LFBGA | 456 | -40 to 85°C | 2032 Jul | 0 | No | Yes | 16-bit x 8-ch, 32-bit x 2-ch, 32-bit x 8-ch | 12-bit x 8-ch | Display Function, Video In | 2.97 - 3.63 | Cortex-A55 x 2 + Cortex-M33 x 1 | 3 | 20.55 | Get Samples, | |
| RZ/V | Cortex-A55 | 1200 | 64 | Cortex-M33 | 128 | DDR3L-1333, DDR4-1600 (16-bit) | Arm Mali-G31 | DRP-AI | - | 2 | 10/100M/1G x 2 ch | USB2.0 x 2 ch (1H. 1H/F/OTG) | 123 | LFBGA | 456 | -40 to 85°C | 2032 Jul | 0 | No | Yes | 16-bit x 8-ch, 32-bit x 2-ch, 32-bit x 8-ch | 12-bit x 8-ch | Display Function, Video In | 2.97 - 3.63 | Cortex-A55 x 1 + Cortex-M33 x 1 | 3 | 19.97 | Get Samples, | |
| RZ/V | Cortex-A55 x 2 | 1200 | 64 | Cortex-M33 | 128 | DDR3L-1333, DDR4-1600 (16-bit) | Arm Mali-G31 | DRP-AI | - | 2 | 10/100M/1G x 2 ch | USB2.0 x 2 ch (1H. 1H/F/OTG) | 123 | LFBGA | 551 | -40 to 85°C | 2032 Jul | 0 | No | Yes | 16-bit x 8-ch, 32-bit x 2-ch, 32-bit x 8-ch | 12-bit x 8-ch | Display Function, Video In | 2.97 - 3.63 | Cortex-A55 x 2 + Cortex-M33 x 1 | 3 | Get Samples, | ||
| RZ/V | Cortex-A55 | 1200 | 64 | Cortex-M33 | 128 | DDR3L-1333, DDR4-1600 (16-bit) | Arm Mali-G31 | DRP-AI | - | 2 | 10/100M/1G x 2 ch | USB2.0 x 2 ch (1H. 1H/F/OTG) | 123 | LFBGA | 551 | -40 to 85°C | 2032 Jul | 0 | No | Yes | 16-bit x 8-ch, 32-bit x 2-ch, 32-bit x 8-ch | 12-bit x 8-ch | Display Function, Video In | 2.97 - 3.63 | Cortex-A55 x 1 + Cortex-M33 x 1 | 3 | 24.16 | Get Samples, | |
| RZ/V | Cortex-A55 x 2 | 1200 | 64 | Cortex-M33 | 128 | DDR3L-1333, DDR4-1600 (16-bit) | Arm Mali-G31 | DRP-AI | - | 2 | 10/100M/1G x 2 ch | USB2.0 x 2 ch (1H. 1H/F/OTG) | 123 | LFBGA | 551 | -40 to 85°C | 2032 Jul | 0 | No | Yes | 16-bit x 8-ch, 32-bit x 2-ch, 32-bit x 8-ch | 12-bit x 8-ch | Display Function, Video In | 2.97 - 3.63 | Cortex-A55 x 2 + Cortex-M33 x 1 | 3 | 25.35 | Get Samples, | |
| RZ/V | Cortex-A55 | 1200 | 64 | Cortex-M33 | 128 | DDR3L-1333, DDR4-1600 (16-bit) | Arm Mali-G31 | DRP-AI | - | 2 | 10/100M/1G x 2 ch | USB2.0 x 2 ch (1H. 1H/F/OTG) | 123 | LFBGA | 551 | -40 to 85°C | 2032 Jul | 0 | No | Yes | 16-bit x 8-ch, 32-bit x 2-ch, 32-bit x 8-ch | 12-bit x 8-ch | Display Function, Video In | 2.97 - 3.63 | Cortex-A55 x 1 + Cortex-M33 x 1 | 3 | 24.76 | Get Samples, | |
| RZ/V | Cortex-A55 | 1200 | 64 | Cortex-M33 | 128 | DDR3L-1333, DDR4-1600 (16-bit) | Arm Mali-G31 | DRP-AI | - | 2 | 10/100M/1G x 2 ch | USB2.0 x 2 ch (1H. 1H/F/OTG) | 123 | LFBGA | 456 | -40 to 85°C | 2032 Jul | 0 | No | Yes | 16-bit x 8-ch, 32-bit x 2-ch, 32-bit x 8-ch | 12-bit x 8-ch | Display Function, Video In | 2.97 - 3.63 | Cortex-A55 x 1 + Cortex-M33 x 1 | 3 | 20 | Get Samples, | |
| RZ/V | Cortex-A55 x 2 | 1200 | 64 | Cortex-M33 | 128 | DDR3L-1333, DDR4-1600 (16-bit) | Arm Mali-G31 | DRP-AI | - | 2 | 10/100M/1G x 2 ch | USB2.0 x 2 ch (1H. 1H/F/OTG) | 123 | LFBGA | 456 | -40 to 85°C | 2032 Jul | 0 | No | Yes | 16-bit x 8-ch, 32-bit x 2-ch, 32-bit x 8-ch | 12-bit x 8-ch | Display Function, Video In | 2.97 - 3.63 | Cortex-A55 x 2 + Cortex-M33 x 1 | 3 | 19.04 | Get Samples, | |
| RZ/V | Cortex-A55 | 1200 | 64 | Cortex-M33 | 128 | DDR3L-1333, DDR4-1600 (16-bit) | Arm Mali-G31 | DRP-AI | - | 2 | 10/100M/1G x 2 ch | USB2.0 x 2 ch (1H. 1H/F/OTG) | 123 | LFBGA | 456 | -40 to 85°C | 2032 Jul | 0 | No | Yes | 16-bit x 8-ch, 32-bit x 2-ch, 32-bit x 8-ch | 12-bit x 8-ch | Display Function, Video In | 2.97 - 3.63 | Cortex-A55 x 1 + Cortex-M33 x 1 | 3 | 19.97 | Get Samples, | |
| RZ/V | Cortex-A55 x 2 | 1200 | 64 | Cortex-M33 | 128 | DDR3L-1333, DDR4-1600 (16-bit) | Arm Mali-G31 | DRP-AI | - | 2 | 10/100M/1G x 2 ch | USB2.0 x 2 ch (1H. 1H/F/OTG) | 123 | LFBGA | 456 | -40 to 85°C | 2032 Jul | 0 | No | Yes | 16-bit x 8-ch, 32-bit x 2-ch, 32-bit x 8-ch | 12-bit x 8-ch | Display Function, Video In | 2.97 - 3.63 | Cortex-A55 x 2 + Cortex-M33 x 1 | 3 | 20.63 | Get Samples, |

This section describes how to set up the RZ/V2L evaluation board kit (EVK) using the demo binary file.
| Blog Post | Dec 22, 2023 | ||
| Blog Post | Sep 22, 2023 | ||
| Blog Post | Jul 21, 2023 | ||
| Blog Post | Feb 3, 2023 | ||
| Blog Post | Jan 27, 2023 | ||
| Blog Post | Apr 18, 2022 | ||
| Blog Post | Feb 15, 2022 | ||
| Blog Post | Nov 15, 2021 |


