
Overview
This project introduces how to execute multiple tasks on GR-PEACH with TOPPERS/ASP, an open source real-time OS, using a web compiler.
For example programs, refer to the GR-PEACH GitHub Wiki.
Preparation
You will need a GR-PEACH board and a USB cable (Micro B type).

Procedure to Execute Sample Program
Creating a Project
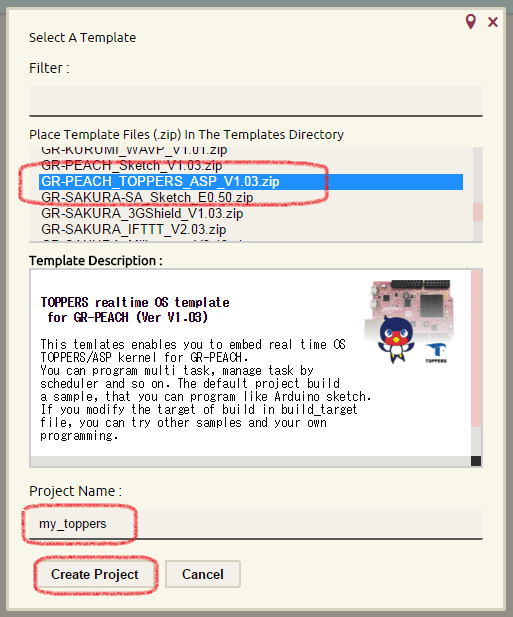
Create a project using the project template for TOPPERS/ASP on the web compiler. If this is your first time to use the web compiler, refer to the Sketch on Web Compiler project for GR-PEACH.
Select "GR-PEACH_TOPPERS_ASP_***.zip" (xxx is a version), give the project a name, and click "Create Project".
Display Your Sketch
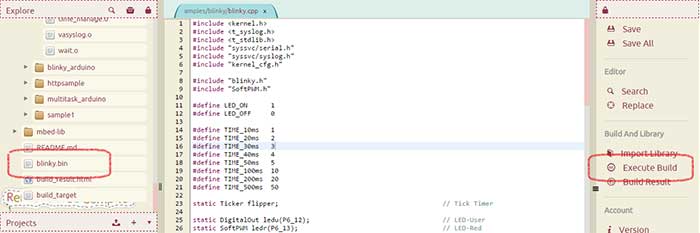
At the default setting, the sample in "examples/blinky" is built. Double click to open "blinky.cpp" from the examples folder.

Build and Program
Click the button "Execute Build". It takes about 30 seconds when executing the first time, due to compilation of all of the source files.
After the build, "blinky.bin" is generated in the project tree. Download and program in to the GR-PEACH board. Then, the red, green, blue, and user LEDs will blink repeatedly every specified time.
Multi-Task Arduino Sketch
With Arduino, a sketch is composed of two functions, the "setup" function which is executed one time and the "loop" function which is executed repeatedly. But, it is a little difficult to execute multiple operations simultaneously.
Using the scheduler on TOPPERS/ASP, you can try the sample of multi-loop functions.
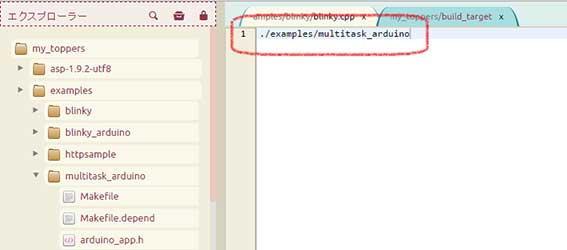
Switching Build Project
To switch the project to build, open "build_target" in the project tree. At the default setting, you will find the description "./examples/blinky".
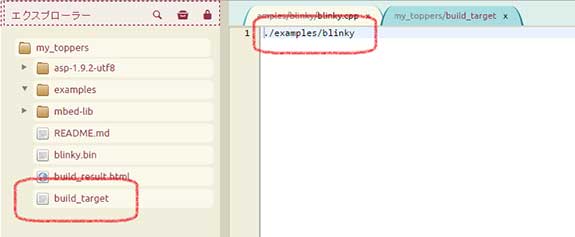
Rewrite "./examples/blinky" to "./examples/multitask_arduino".
Display sketch
Double click to open "multitask_arduino.cpp" in the folder "examples/multitask_arduino" in the project tree. You can find 3 loop functions, loop, loop1 and loop2.

Build and Program
After executing the build, "multitask_arduino.bin" is generated. Program this into GR-PEACH. Each loop function blinks each red, green and blue LED.
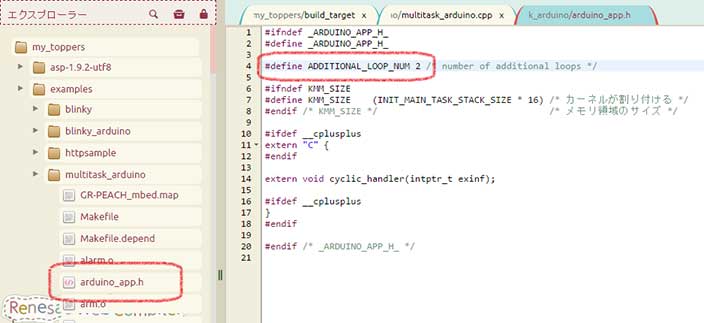
Adding a Loop
To add a loop, increase the number of macro "ADDITIONAL_LOOP_NUM" described in "arduino_app.h" in the folder "examples/multitask_arduino". For example in the case of setting five loops, you can add loop3, loop4 and loop5.
Sample to Measure Temperature and Humidity
As an appendix, the program below is a sample to output the value of the temperature and humidity sensor HDC1000 and control the LED separately. To operate HDC1000, connect SCL/SDA to the Wire pin and RDY to pin 2 on GR-PEACH.
#include <kernel.h>
#include <t_syslog.h>
#include <t_stdlib.h>
#include "syssvc/serial.h"
#include "syssvc/syslog.h"
#include "kernel_cfg.h"

#include "arduino_app.h"
#include "arduino_main.h"

#include <Arduino.h>
#include <Wire.h>

#define HDC1000_ADDRESS 0x40
#define HDC1000_RDY_PIN 2

#define HDC1000_TEMPERATURE_POINTER     0x00
#define HDC1000_HUMIDITY_POINTER        0x01
#define HDC1000_CONFIGURATION_POINTER   0x02
#define HDC1000_SERIAL_ID1_POINTER      0xfb
#define HDC1000_SERIAL_ID2_POINTER      0xfc
#define HDC1000_SERIAL_ID3_POINTER      0xfd
#define HDC1000_MANUFACTURER_ID_POINTER 0xfe

#define HDC1000_CONFIGURE_MSB 0x10 /* Get both temperature and humidity */
#define HDC1000_CONFIGURE_LSB 0x00 /* 14 bit resolution */

void getTemperatureAndHumidity(float *temperature, float *humidity) {
  unsigned int tData, hData;

  Wire.beginTransmission(HDC1000_ADDRESS);
  Wire.write(HDC1000_TEMPERATURE_POINTER);
  Wire.endTransmission();
  while (digitalRead(HDC1000_RDY_PIN) == HIGH);
  Wire.requestFrom(HDC1000_ADDRESS, 4);
  while (Wire.available() < 4);

  tData = Wire.read() << 8;
  tData |= Wire.read();

  hData = Wire.read() << 8;
  hData |= Wire.read();

  *temperature = tData / 65536.0 * 165.0 - 40.0;
  *humidity = hData / 65536.0 * 100.0;
}

#define INTERVAL       100
#define INTERVAL_RED   100
#define INTERVAL_BLUE  150
#define INTERVAL_GREEN 200

void setup()
{
    pinMode(PIN_LED_RED   , OUTPUT);
    pinMode(PIN_LED_GREEN , OUTPUT);
    pinMode(PIN_LED_BLUE  , OUTPUT);
    pinMode(PIN_LED_USER  , OUTPUT);
      pinMode(PIN_SW        , INPUT);
    pinMode(HDC1000_RDY_PIN, INPUT);

    Serial.begin(9600);
  //Put the HDC1000 IC into the correct operating mode
    Wire.beginTransmission(HDC1000_ADDRESS);
    Wire.write(HDC1000_CONFIGURATION_POINTER);
    Wire.write(HDC1000_CONFIGURE_MSB);
    Wire.write(HDC1000_CONFIGURE_LSB);
    Wire.endTransmission();
}

void loop(){
  float temperature, humidity;

  getTemperatureAndHumidity(&temperature, &humidity);
  Serial.print("Temperature = ");
  Serial.print(temperature);
  Serial.print(" degree, Humidity = ");
  Serial.print(humidity);
  Serial.println("%");
  Serial.flush();

  delay(1000);
}

void loop1()
{
    while(digitalRead(PIN_SW) == 0){
        digitalWrite(PIN_LED_USER, 1);
        delay(INTERVAL);
        digitalWrite(PIN_LED_USER, 0);
        delay(INTERVAL);
    }
}

void loop2(){
    digitalWrite(PIN_LED_BLUE, 1);
    delay(INTERVAL_BLUE);
      digitalWrite(PIN_LED_BLUE, 0);
      delay(INTERVAL_BLUE);
}

/*
 *  Cyclic Handler
 *
 *  This handler is called every 10 [ms] as specified in
 *  multitask_arduino.cfg.
 */
void cyclic_handler(intptr_t exinf) {
    irot_rdq(LOOP_PRI); /* change the running loop. */
}