Overview
This Gadget Renesas project allows users to light an LED on GR-PEACH after pushing the button.
Preparation
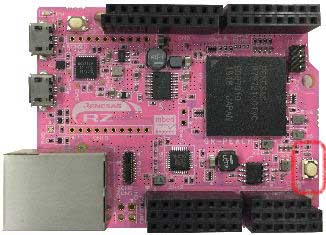
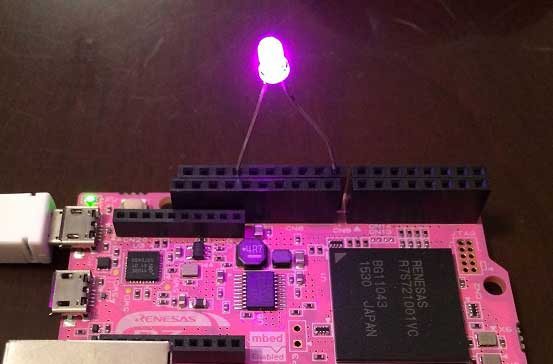
You will need a GR-PEACH board and a USB cable (Micro B type). This project uses an external LED, but it is also okay to use the LED on GR-PEACH.

Making the LED Flicker
The simple sample code below makes the blue light LED flicker.
The blue light LED is assigned to pin86 on GR-PEACH, using PIN_LED_BLUE digitalWrite have the LED ON/OFF, the Red light LED is assigned to PIN_LED_RED (or pin84), the green LED is assigned to PIN_LED_GREEN (pin85), and another red light is assigned to PIN_LED_USER (pin87). Try to change the part of PIN_LED_BLUE below.
#include <arduino.h>
void setup() {
  pinMode(PIN_LED_BLUE, OUTPUT);
  digitalWrite(PIN_LED_BLUE, HIGH);
}

void loop() {
  digitalWrite(PIN_LED_BLUE, LOW);
  delay(500);
  digitalWrite(PIN_LED_BLUE, HIGH);
  delay(500);
}
Making the LED Light Slowly
To make the LED light slowly as if a glowing firefly, use analogWrite; digitalWrite mentioned above, just have the LED ON/OFF. Using analogWite, set the luminance in the range of 0~255.
Anode on the LED is connected with pin8, cathode is connected with GND in the image. You can also flash the LED on GR-PEACH, changing the LED.
#include <arduino.h> #define LED 8 // led void setup() { } void loop() { for(int i = 0; i < 255; i++){ analogWrite(LED, i); delay(5); } for(int i = 0; i < 255; i++){ analogWrite(LED, 255 - i); delay(5); } }
This is the sample code that will drive the LED on GR-PEACH after pushing the button.
#include <arduino.h>
void setup() {
    pinMode(PIN_LED_GREEN, OUTPUT);
    pinMode(PIN_SW, INPUT);
}

void loop() {
    if(digitalRead(PIN_SW) == 0){
        digitalWrite(PIN_LED_GREEN, HIGH);
    } else {
        digitalWrite(PIN_LED_GREEN, LOW);
    }
}