
This is the procedure from setting up the evaluation environment to running the sample program. (Click here for RZ/V2MA)
Please refer the AI Evaluation software for the evaluation of DRP-AI itself. Also, refer to the RZ/V2L, RZ/V2M, RZ/V2MA AI Evaluation Software Guide revision 7.40 (PDF | English, 日本語) in DRP-AI Support Package for information on how to use the evaluation software.
Learn more about the RZ/V Series
RZ/V2L MPU
You can easily try out AI applications using RZ/V2L MPUs by following the steps below.
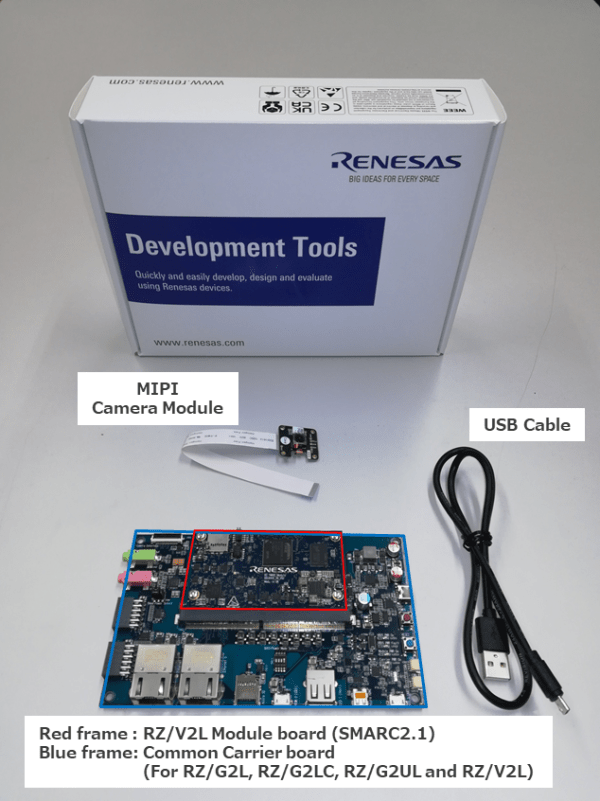
Step 1: Obtain an evaluation board
The RZ/V2L Evaluation Board Kit (EVK) is the ideal board kit for RZ/V2L evaluation. MIPI camera module is included, and you can start evaluating RZ/V2L immediately by building an environment according to the following procedure.
Step 2: Obtain Linux environment
RZ/V Verified Linux Package for RZ/V2L is available. Please obtain the latest environment from
RZ/V Verified Linux Package v3.0.4 (ZIP)
Please follow the instructions in the following document on Ubuntu PC when you setting up.
Linux Start-up Guide (PDF)
(This document is included in the RZ/V Verified Linux Package.)
<Points to consider when referring to the Start-up Guide >
- For more information about VLP, please refer to RZ/V Verified Linux Package [5.10-CIP].
- Please prepare a Linux PC environment for Table 1.
- Follow the instructions in the 2.Build Instructions to build. This may take several hours.
- The RZ MPU Graphics Library is required to implement the DRP-AI AI inference sample application described below. Please download the corresponding evaluation version from the following link and apply it according to the procedure in chapter 2(2).
RZ MPU Graphics Library Evaluation Version for RZ/V2L - Follow the instructions in chaptor2(5) when building in an offline environment.
Step 3: EVK setup
Using the prepared environment, let's start the Linux environment on EVK.
Linux Start-up Guide (PDF)
(This document is included in the RZ/V Verified Linux Package.)
Step3-1: Write Bootloader to EVK using Flash Writer.
<point>
- Follow the steps in Chapter 4 to write Bootloader using Flash Writer after writing Flash Writer.
- This procedure uses the SCIF Download Mode described in chapter 4.1.1.
- Use the Flash Writer and Bootloader generated in Step 2. (Use the files described in Table 3)
- Although a boot loader is written to the EVK at the time of shipment, please be sure to write the boot loader generated in Step 2 to your EVK before use.
- If you use network boot, please refer to chapter 4 of RZ/V2L DRP-AI Support Package Version 7.41 Release Note (PDF)
Step3-2: Create an SD card on Ubuntu PC.
<point>
- Create a partition on the SD card according to the procedure in chapter 3.1.
- Write the Linux Kernel/Device tree/root filesystem created in Step 2.
Step3-3: Insert the created SD card into the EVK board and boot the Linux environment.
<point>
- Follow the procedure in chapter 5 to change the SW11 settings, set the U-Boot environment variable, and then start the Kernel.
- This procedure uses QSPI Boot(1.8V) Mode.
Now the Linux environment has been started (Login).
Step 4: Apply DRP-AI environment
Next, the DRP-AI environment is applied. The RZ/V2L DRP-AI Support Package is available on Ubuntu PCs to support the DRP-AI functionality of RZ/V2L. Please obtain the latest environment from
RZ/V2L DRP-AI Support Package Version 7.40 (Zip)
Please follow the instructions in the following document when setting up your environment.
RZ/V2L DRP-AI Support Package Version 7.30 Release Note (PDF)
(This document is included in the RZ/V2L DRP-AI Support Package.)
<point>
- For more information about DRP-AI Support Package, please refer to RZ/V2L DRP-AI Support Package.
- Build the environment created in Step 2 according to the procedures in Section 3.2.
- Replace the data written to the SD card up to Step 3 with the data created in this step.
- Expand the meta-rz-features.tar.gz with the same name as the meta-rz-teatures.tar.gz of the RZ MPU Graphics Library extracted in Step 2 according to the procedure in Chapter 3.2.3, the diff for this Package will be merged under the meta-rz-features folder.
Step 5: Build the DRP-AI sample application
Build the sample application by creating an SDK environment in Ubuntu PC to cross-compile the sample application included in the RZ/V2L DRP-AI Support Package obtained in Step 4.
Step5-1: Build the SDK environment.
RZ/V2L DRP-AI Support Package Version 7.41 Release Note (PDF)
(This document is included in the RZ/V2L DRP-AI Support Package.)
<point>
- Follow the steps in chapter 6 to compile and configure the SDK environment.
Step5-2: Build the sample application in the SDK environment.
RZ/V2L DRP-AI Sample Application Note revision 7.40 (PDF)
(This document is included in the RZ/V2L DRP-AI Support Package.)
<point>
- Follow the steps in Chapter 2 to build the sample application.
- Set the working folder as "APP_WORK" and deploy the sample application there.
- Table 1.2 in Sample Application Note lists the sample applications included in the package. For details of the sample applications, please refer to their respective pages.
- We recommend that you first try the application (Darknet Tiny YOLOv2 MIPI Camera version).
Step5-3: Store the built application to the SD card.
RZ/V2L DRP-AI Sample Application Note revision 7.40 (PDF)
(This document is included in the RZ/V2L DRP-AI Support Package.)
<point>
- Save the application execution environment created in Chapter 3 to the SD card created in Step 4.
Step 6: Run the DRP-AI sample application
Insert the SD card created in Step5-3 into the EVK configured in Step4 and run the sample application.
Step6-1: Power on the board and boot Linux.
<point>
- Since EVK has already been set up in Step 3, Linux will boot simply by turning on the power.
Step6-2: Run the application.
RZ/V2L DRP-AI Sample Application Note revision 7.40 (PDF)
(This document is included in the RZ/V2L DRP-AI Support Package.)
<point>
- Follow the steps in Chapter 4 to run the sample application.
- Please refer to Table 1.2 for the input/output data and the AI model used for each sample application. For applications where the Input Image is a USB Camera, the customer must provide their own USB camera.
Related Information:
RENESAS.info
(Information for engineers, from engineers)
Option 1: Obtain Simple ISP environment and run sample applications
RZ/V2L ISP Support Package is available to support RZ/V2L's Simple ISP feature.
(Note)
After applying the RZ/V2L ISP Support Package, the internal ISP function of the MIPI camera module included with EVK will be disabled, so the following sample application included with the RZ/V2L DRP-AI Support Package, which was implemented in Step 5, cannot be used.
- app_tinyyolov2_cam
- app_hrnet_cam
- app_hrnet_pre-tinyyolov2_cam
Apply the RZ/V2L ISP Support Package only if you want to use the Simple ISP feature of RZ/V2L.
See RZ/V2L ISP Support Package note of caution (PDF) for details.
RZ/V2L ISP Support Package Version 1.30 (ZIP)
Please follow the instructions in the following document when setting up your environment.
RZ/V2L ISP Support Package Version 1.30 Release Note (PDF)
(This document is included in the RZ/V2L ISP Support Package.)
<point>
- For more information about ISP Support Package, please refer to RZ/V2L ISP Support Package.
- Follow the instructions in Chapter 2 to build the environment created in Step 4. To apply this package, an environment to which RZ/V2L DRP-AI Support Package or earlier has been applied is required.
- By applying the RZ/V2L ISP Support Package, you can run the Darknet Tiny YOLOv2 ISP version sample application that uses both DRP-AI inference and Simple ISP.
The RZ/V2L ISP Support Package also includes a sample application to test Simple ISP stand-alone functionality. Please refer to the following document for details.
RZ/V2L Simple ISP Sample Application Note Revision.1.30 (PDF)
Option2: Change the AI model
If you wish to use a model other than the AI model provided as a sample, please follow the guide below.
RZ/V2L, RZ/V2M, RZ/V2MA AI Implementation Guide Get Started revision 7.40 (PDF | English, 日本語)
(This document is included in the RZ/V2L DRP-AI Support Package.)
<point>
- The Implementation Guide is divided into a common part (Get Started) and an individual part (Pytorch ResNet, Darknet YOLO, etc.). The link above is for Get Started only. Please obtain the model-specific parts from the RZ/V2L DRP-AI Package according to the model you are using.