
Overview
This tutorial introduces the procedure of outputting a file for the e-AI Translator and executing it on a GR board with "MNIST For ML Beginners" in a TensorFlow example.
The example of MNIST is a compact AI of a single combined layer.

Preparation
Hardware
Prepare one of the Gadget Renesas boards. However, GR-KURUMI, GR-COTTON and GR-ADZUKI can not be executed on the board because the ROM capacity is insufficient for the C source output in this tutorial.
Python, TensorFlow
Follow the steps on the TensorFlow installation page to create an environment in which Python and TensorFlow can run. It is recommended to upgrade to the latest environment via pip command.
pip3 install --upgrade tensorflow
e-AI Translator
Since this tutorial uses the web compiler's e-AI Translator, installation is unnecessary. You can also use the e-AI Translator with the e2 studio plug-in, refer to the e-AI Translator manual to install it.
Compile (Build) Environment
In this tutorial, it is not necessary to install any compiler because the binary (bin file) can be built by the web compiler and executed on the GR board. You can also do it in the build environment with e2 studio.
Execution of Machine Learning
In order to output the learned AI model for the e-AI Translator, execute the following Python code for MNIST. Refer to the end of this page for the difference with the original code.
Click the link below to start the download. Download it to an arbitrary folder and unzip it.
Python Code for MNIST (ZIP)
Go to the folder downloaded at the terminal and execute the following code.
python mnist_softmax_for_e-ai.py
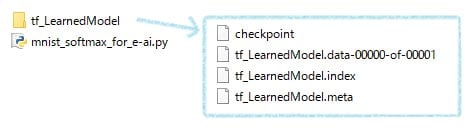
Four files are generated in tf_LearnedModel as follows. This is the learned AI model for the e-AI Translator.
Execution of e-AI Translator
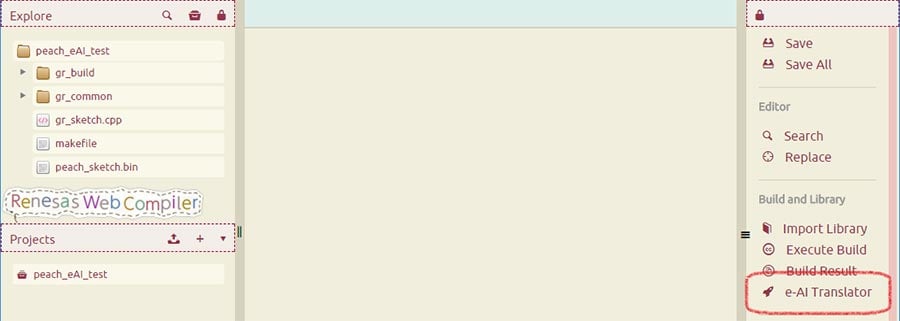
Log in to the web compiler and create a new project. Then press the "e-AI Translator" button as shown in the image.
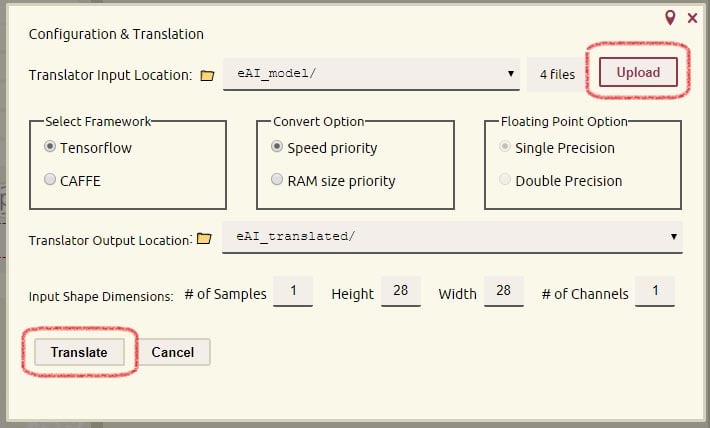
Next, press the "Upload" button and specify the tf_LearnedModel folder containing the learned AI model. Four files will be uploaded to the e-AI_Model folder. Press the "Translate" button with the other settings as they are.
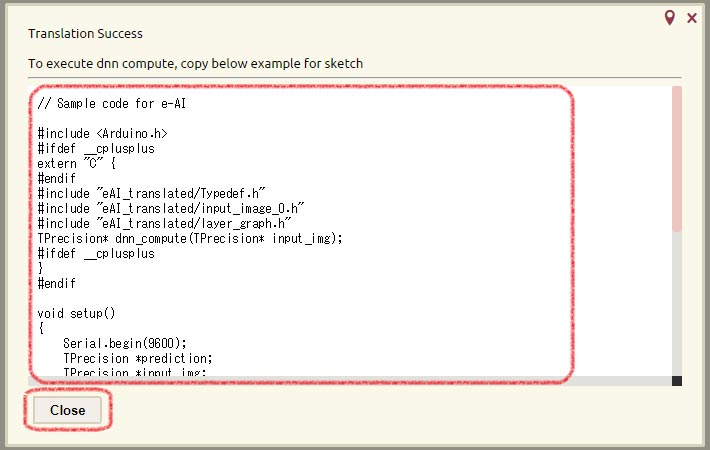
If successful, "Translation Success" is displayed as shown here, and the sample program is displayed. We will use the sample program as it is, so let's copy the text and then close the window. The E-AI Translator plug-in in e2 studio can also translate by specifying the AI model in the same way.
Running AI
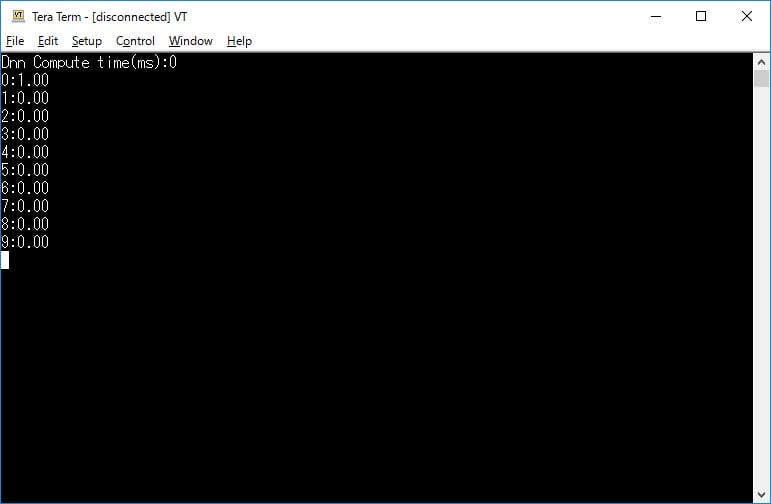
Build the displayed sample program after copying it to gr_sketch.cpp. After the build, when executed on the GR board, the inference time and inference result are displayed as shown here.
Below, you can download the sample header by clicking the image. This time we read the handwritten numerical data prepared in advance, but if you convert from a camera image into a 28 x 28 float type gray image and input it, you can distinguish the numbers.
![]()
![]()
![]()
![]()
![]()
![]()
Reference: About the e-AI Translator Input File
In the input file, a code for the e-AI Translator is added to the Python code of the following URL.
The added code is on lines 81 to 89 highlighted below. Added the code to output AI after learning as a graph structure to the position after learning completion. Use this sample case when outputting other AI models.
The comment-out part of lines 41 to 46 is to eliminate the application of the setting item "input shape size" in the e-AI Translator. TensorFlow cannot obtain the shape of the input variable by using the variable used at input, as it is in the next layer. Once received with another variable, shape is fixed so that it does not depend on the "input shape size" setting.
# Copyright 2015 The TensorFlow Authors. All Rights Reserved.
#
# Licensed under the Apache License, Version 2.0 (the "License");
# you may not use this file except in compliance with the License.
# You may obtain a copy of the License at
#
#     http://www.apache.org/licenses/LICENSE-2.0
#
# Unless required by applicable law or agreed to in writing, software
# distributed under the License is distributed on an "AS IS" BASIS,
# WITHOUT WARRANTIES OR CONDITIONS OF ANY KIND, either express or implied.
# See the License for the specific language governing permissions and
# limitations under the License.
# ==============================================================================

"""A very simple MNIST classifier.

See extensive documentation at
https://www.tensorflow.org/get_started/mnist/beginners
"""
from __future__ import absolute_import
from __future__ import division
from __future__ import print_function

import argparse
import sys

from tensorflow.examples.tutorials.mnist import input_data

import tensorflow as tf

FLAGS = None


def main(_):
  # Import data
  mnist = input_data.read_data_sets(FLAGS.data_dir, one_hot=True)

  # Create the model
  x = tf.placeholder(tf.float32, [None, 784])

 #Add Renesas 2 --------- ----------
  # change
  #  x_ = tf.placeholder(tf.float32, [None, 784])
  #  x = tf.reshape(x_, [-1])
  # --------- ----------

  W = tf.Variable(tf.zeros([784, 10]))
  b = tf.Variable(tf.zeros([10]))
  y = tf.matmul(x, W) + b

  # Define loss and optimizer
  y_ = tf.placeholder(tf.float32, [None, 10])

  # The raw formulation of cross-entropy,
  #
  #   tf.reduce_mean(-tf.reduce_sum(y_ * tf.log(tf.nn.softmax(y)),
  #                                 reduction_indices=[1]))
  #
  # can be numerically unstable.
  #
  # So here we use tf.nn.softmax_cross_entropy_with_logits on the raw
  # outputs of 'y', and then average across the batch.
  cross_entropy = tf.reduce_mean(
      tf.nn.softmax_cross_entropy_with_logits(labels=y_, logits=y))
  train_step = tf.train.GradientDescentOptimizer(0.5).minimize(cross_entropy)

  sess = tf.InteractiveSession()
  tf.global_variables_initializer().run()
  # Train
  for _ in range(1000):
    batch_xs, batch_ys = mnist.train.next_batch(100)
    sess.run(train_step, feed_dict={x: batch_xs, y_: batch_ys})

  # Test trained model
  correct_prediction = tf.equal(tf.argmax(y, 1), tf.argmax(y_, 1))
  accuracy = tf.reduce_mean(tf.cast(correct_prediction, tf.float32))
  print(sess.run(accuracy, feed_dict={x: mnist.test.images,
                                      y_: mnist.test.labels}))

  #Add Renesas 1 --------- ----------
  import os
  #Save Learned AI
  out_dir = "./tf_LearnedModel"
  if os.path.isdir(out_dir) is False:
      os.makedirs(out_dir)
  saver = tf.train.Saver()
  saver.save(sess, out_dir+"/tf_LearnedModel")
  # --------- ----------

if __name__ == '__main__':
  parser = argparse.ArgumentParser()
  parser.add_argument('--data_dir', type=str, default='/tmp/tensorflow/mnist/input_data',
                      help='Directory for storing input data')
  FLAGS, unparsed = parser.parse_known_args()
  tf.app.run(main=main, argv=[sys.argv[0]] + unparsed)
Reference: About Output File of the e-AI Translator
The outline of the file output by the e-AI Translator is shown below. Check the files by double clicking on the web compiler.
| File Name | Description |
|---|---|
| dnn_compute.c | Inference execution function of the converted neural network |
| network.c | Neural network function library |
| layer_graph.h | Prototype declaration of the library function used in the converted neural network |
| layer_shapes.h | Variable definition used in the converted neural network |
| weights.h | Weight of the converted neural network, bias value |
| Typedef.h | Type definition when using library |
| input_image_0.h | Sample character data in MNIST format |
| network_description.txt | Layer definition recognized as a result of analyzing the structure of the neural network and its configuration |
| checker_log_output.txt | From the above analyzed structure, the result of estimating ROM/RAM capacity calculation amount, which becomes a standard by using a mathematical formula. However, speed priority and RAM consumption reduction priority options are not considered yet. Actually, since the value of the node is redefined as an argument, the actual required capacity is 2 to 3 times. |