
Web Server Part 1
Overview
GR-PEACH can work as a web server. This project introduces an example of operating an LED on the Gadget Renesas GR-PEACH board from a web browser (client-side).
Preparation
You will need a GR-PEACH board, USB cable (Micro B type), LAN cable, and a Micro SD card.
Connect the NTSC signal as follows. There are two of them - NTSC-1A and the GND.
Sample program for LED remote controller
First, save the files "index.htm" and "mbedrpc.js" on the Micro SD. These files are for browser indication.
Right click the following files and execute “save an object in file", for download.
After saving, insert the Micro SD into an SD socket on the back side of GR-PEACH and copy the following sketch program in gr_sketch.cpp to build and write them to GR-PEACH.
#include <Arduino.h>
#include "HTTPServer.h"
#include "mbed_rpc.h"
#include "SdUsbConnect.h"

//#define USE_WIFI

#ifdef USE_WIFI
#include "ESP32Interface.h"
ESP32Interface network;
#define WLAN_SSID            ("xxxxxxxx")
#define WLAN_PSK             ("xxxxxxxx")
#define WLAN_SECURITY        NSAPI_SECURITY_WPA_WPA2
#else
#include "EthernetInterface.h"
EthernetInterface network;
#endif

/** Network setting **/
#define USE_DHCP               (1)
#if (USE_DHCP == 0)
#define IP_ADDRESS           ("192.168.11.2")     /* IP address      */
#define SUBNET_MASK          ("255.255.255.0")    /* Subnet mask     */
#define DEFAULT_GATEWAY      ("192.168.11.3")     /* Default gateway */
#endif

SdUsbConnect storage("storage");
void AnalogRead(Arguments* arg, Reply* r);
int char_to_int(char* c, int len);

int char_to_int(char* c, int len){
    int r = 0;
    for (int i = 0; i < len; i++) {
        if (c[i] == 0) break;
        r = r * 10 + c[i] - '0';
    }
    return r;
}

void analogwrite(Arguments* arg, Reply* r) {
    if (arg != NULL) {
        /* command analysis and execute */
        analogWrite(char_to_int(arg->argv[0], 2), char_to_int(arg->argv[1], 3));
    }
}

void setup(void) {

  Serial.begin(9600);
  Serial.println("********* PROGRAM START ***********");

  // SD & USB
  Serial.print("Finding strage..");
  storage.wait_connect();
  Serial.println("done");

  RPCFunction rpc_analogwrite(&analogwrite, "analogWrite");

  Serial.print("Network Setting up...\r\n");
#if (USE_DHCP == 0)
  network.set_dhcp(false);
  if (network.set_network(IP_ADDRESS, SUBNET_MASK, DEFAULT_GATEWAY) != 0) { //for Static IP Address (IPAddress, NetMasks, Gateway)
    Serial.println("Error");
  }
#endif
#ifdef USE_WIFI
  network.set_credentials(WLAN_SSID, WLAN_PSK, WLAN_SECURITY);
#endif
  if (network.connect() != 0) {
    return;
  }

  Serial.print("MAC Address is ");
  Serial.println(network.get_mac_address());
  Serial.print("IP Address is ");
  Serial.println(network.get_ip_address());
  Serial.print("NetMask is ");
  Serial.println(network.get_netmask());
  Serial.print("Gateway Address is ");
  Serial.println(network.get_gateway());
  Serial.println("Network Setup OK\r\n");

  FSHandler::mount("/storage", "/");
  HTTPServerAddHandler<FSHandler>("/");
  HTTPServerAddHandler<RPCHandler>("/rpc");
  HTTPServerStart(&network, 80);

}

void loop() {
}
Operation Check for the LED Remote Controller
Start a serial monitor such as Tera Term after write down to GR-PEACH; then, press the reset button on GR-PEACH. The IP address acquired by DHCP will be shown.

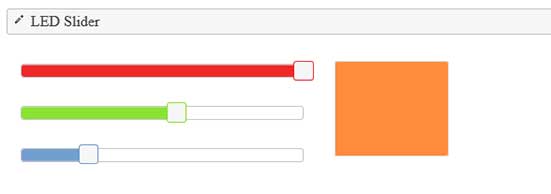
Put the displayed IP address into the URL on the web browser. The screen shown to the right will be displayed.
With operating a slider for R(red), G(green), B(blue), the color of the LED on GR-PEACH will change.

