

Sometimes users prefer to program a new microcontroller kit using simple programming utilities instead of using full-blown, bulky development toolchains. Doing so is particularly useful when users are getting acquainted with the kit, don’t have an IDE installed on their computers, want to quickly explore the functionality of an example project on their RA kits, or are just not ready to dive deep into the source code. Users can quickly and easily program RA MCU innovation kits for IoT using popular flash programming utilities to explore the functionality offered by more than 600 example projects.
This blog provides useful information on programming a pre-built hex file onto an RA kit using Renesas Flash Programmer and Segger® J-Flash Lite without having to build the source code or use an IDE. The EK-RA6M5 kit and Quick Start example project for the EK-RA6M5 kit are used to illustrate the procedure. The procedure to program any example project on any of the similar RA kits is the same.
Quickly Programming RA MCU Innovation Kits for IoT
Pre-requisites:
a) Download Hex file – Go to Example Project page on GitHub and browse to ra-fsp-examples/example_projects/ek_ra6m5/_quickstart/quickstart_ek_ra6m5_ep/e2studio/. Locate quickstart_ek_ra6m5_ep.hex and download it to a local directory on the host computer. Make sure that the file extension is hex.
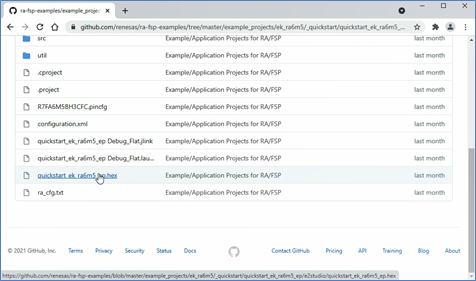
EK-RA6M5 Quick Start example project hex file download from GitHub
b) Install Segger® J-Link driver – Almost all Renesas advanced microcontroller kits, including the EK-RA6M5, use on-board J-Link debugging emulator. The J-Link drivers are required for the kit to be detected by the host computer. The J-Link drivers are included in the J-Link Software and Documentation Pack. Download the exe file, execute it, make sure to select “Install USB driver for J-Link” in the installation wizard, and complete the installation.
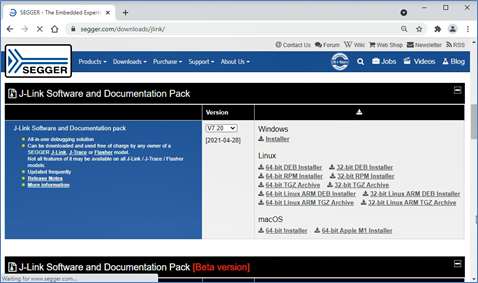
J-Link driver & J-Flash download as a part of J-Link Software and Documentation Pack
Verify driver installation: Connect the USB debug port (J10) of the EK-RA6M5 board to the USB port of the computer using the micro USB cable. The orange debug LED next to the USB debug port on the board will start blinking. It will blink until the J-link drivers are detected and initialized, after which the LED will remain lit up. This happens quite fast.
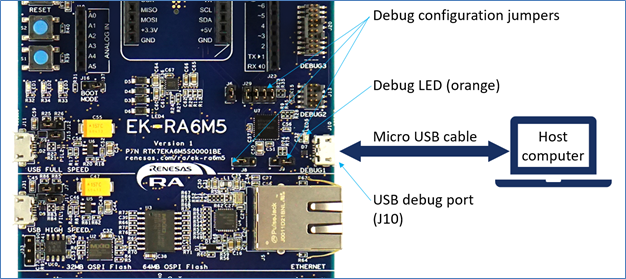
Verifying J-Link driver installation using EK-RA6M5 kit
1. Renesas Flash Programmer (RFP) - It is a computer-controlled programming utility with a simple graphical user interface for the first-time developers. It is highly configurable, supports Renesas E2 and Segger® J-Link emulators, and is available for Windows and Linux platforms.

Renesas Flash Programmer
A free-of-charge edition of RFP for Windows® can be downloaded from the Release Information section of the RFP webpage. Accept the agreement, download the compressed folder, extract the contents, and run the exe file to install RFP. Use the default options during the installation.
Launch RFP, create a new project, select J-Link as the Communication Tool. Next, click browse to locate the hex file of the Quick Start example project (refer to pre-requisite a), and click run. The code flash of the RA MCU on the kit will get programmed, and the programmed contents will be verified. Once the operation is complete, the example project will begin to execute on the kit. In the case of the EK-RA6M5 Quick Start example project, the blue user LED on the kit will flash indicating that the Quick Start Example project is executing. Refer to the video above for step-by-step instructions.
2. J-Flash Lite – It is a simple to use, reduced feature set flash programming utility included in the J-Link Software and Documentation Pack (refer to pre-requisite b, J-Flash is installed along with J-Link drivers).
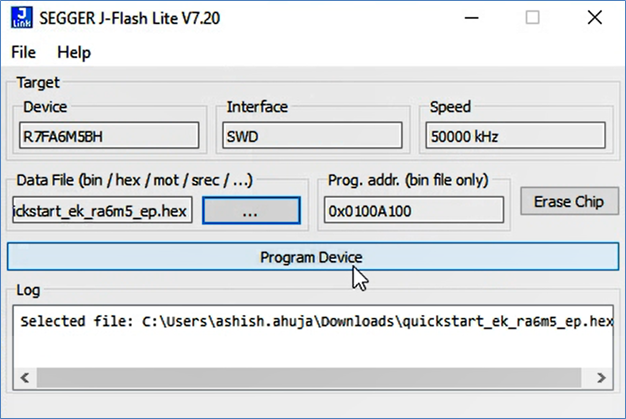
Segger® J-Flash Lite
Launch J-Flash Lite, browse to the MCU list and locate the RA6M5 MCU (the part number can be found below the MCU on the kit). Select interface as SWD and connection speed of choice. Click OK. Next, browse to the hex file and click Program Device. Once the operation is complete, reset the kit by pressing the red reset button. The example project will begin to execute on the kit flashing the blue used LED. Refer to the video above for step-by-step instructions.
There are over 600 example projects for different RA kits across several toolchains and more are being developed to help users kickstart their innovation journey. These example projects can be easily programmed using RFP and J-Flash Lite without having to install bulky tool chains enabling users a shorter path to evaluate the features of the RA kits. Users are invited to join the Renesas community on the RA support forum. This is where they can ask questions and get assistance from Renesas experts and collaborate with other members of the Renesas community.
We hope that users enjoy innovating with the RA microcontroller kits as much as we have enjoyed developing them. Users can order their favorite kit and bring their big ideas to life!
Learn more at renesas.com/ra/kits